
How to Stop Nosebleeds
Nosebleeds, also known as epistaxis, they are usually not something you should be worried about. However, for someone who has never experienced them, they can seem concerning, making them feel apprehensive. It is important to remember that it is highly unlikely that your nosebleed poses a threat to your medical health, and you generally will not need to go to a doctor. Nosebleeds are usually manageable with the proper techniques. Let's have a look at the preventive measures and the appropriate treatment for nosebleeds.Understanding NosebleedNosebleeds are quite common and usually last from a few seconds to 15 minutes. Anyone can get one, but they are more prevalent among children and adults living in dry climates. While they can be unsettling, understanding what causes them and how to handle them can alleviate concerns.What Causes Nosebleeds?You need to be aware of the factors that might lead to nosebleeds; being equipped with the right information can help prevent future occurrences. Here are three common causes:Lack of humidity: Low humidity can dry out the nasal membranes, making them more susceptible to bleeding. Climate changes and dry air are a common cause for nosebleeds among adultsNasal Irritation: Allergies, colds, or sinus infections can irritate the nasal lining, leading to nosebleeds.Injury: A blow to the nose or frequent nose-picking can damage blood vessels, resulting in a random nosebleed.Treatment: How to Stop a NosebleedIf your nose starts bleeding, follow these steps for effectively to stop or control the bleeding:Don�t Panic: If you start bleeding from the nose, it is imperative that you remain calm. You mustn�t panic. Feeling anxious can lead to a rise in blood pressure, consequently worsening the bleeding.If you�re leaning back- Sit Up Straight. Lean slightly forward helps prevent blood from going down your throat; leaning slightly forward will help avoid gagging or choking.Pinch Your Nose: Use your thumb and index finger to pinch the soft part of your nose, right below the bridge, and hold it for about 5 to 15 minutes. This compresses the blood vessels and often stops the bleeding within the time frame given above. If you are assisting a child, ask them to breathe through their nose while remaining in the former positionUse a Cold Compress: holding up a cold pack or even ice cubes wrapped in a cloth to the bridge of your nose can constrict blood vessels and immensely reduce the flow of blood.Avoid Nose Blowing: Once the bleeding stops, refrain from blowing your nose for a couple of hours this allows the blood vessels to heal.Moisturise Your Nasal Passages: If you frequently experience nosebleeds, resort to methods that will keep your nasal passages moist. Consider using an ointment like Vaseline, a saline nasal spray might be helpful, and a humidifier might help maintain the humidity level indoors. Steam might also be helpful. If none of these methods stop the bleeding, consult your doctor immediately.� .main{ border:3px solid #0f7c90; border-radius:20px; position: relative; font-family:roboto; font-weight: 400; color: #000; } .main-two{ position: absolute; top:-25px; left:45px; background-color:white; } .img-div{ border-radius : 100%; padding:2px 7px; background-color:#0f7c90; margin-right:5px; width: 50px; height: 50px; } .img{ width:30px; object-fit:contain; height:auto; border-radius : 100%; } @media only screen and (max-width: 600px) { .heading{ font-size:20px; } .img{ width:20px; object-fit:contain; height:auto; border-radius : 100%; } .img-div{ width: 40px; height: 40px; } .main-two{ left:25px; } } Nosebleeds are a common phenomenon. There are various factors that lead to a nosebleed knowing how to handle nosebleeds swiftly and effectively can be a useful skill to possess. To ensure you're equipped with the essential skills to manage various first aid scenarios, enrol in our Emergency First Aid at Work Course. Sign up now and take the first step towards becoming a well-informed first responder! PreventionThere are a plethora of techniques you can use to reduce the frequency of nosebleeds,: consider these preventative measures:Maintain the humidity inside your home: When the climate suddenly changes and you�re experiencing dry weather, get a room humidifier. It helps maintain moisture in the air.Stay Hydrated: Drink plenty of water to keep your body hydrated and your nasal membranes moist.Use Saline Nasal Sprays: These can help prevent dryness in the nasal passages.Stay away from pollutants: Avoid dusty areas, and stay away from cigarette smoke and other pollutants that can damage the nasal lining.Practise Gentle Nose Blowing: If you feel the need to blow your nose you must practise gentle blowing. Blowing your nose gently can substantially minimise irritation and prevent random nose bleeds.Wear protective gear: wear a head guard while engaging in activities in which there is a possibility of an injury to the nose and head. A good example would be outdoor activities like biking or mountain climbingFirst Aid For NosebleedIn case of a nosebleed, knowing basic steps while being equipped with the right first aid items can be very helpfulFollow the Treatment Steps: Remember to stay calm, sit up straight while leaning slightly forward, and pinch your nose underneath the bone structure.Keep a First Aid Kit: Your kit should include saline nasal spray and if possible, cold packs to prepare for unexpected nosebleeds.When Should You Seek Emergency HelpWhile most nosebleeds can be treated at home, certain situations require immediate medical attention:Bleeding Persists: If a nosebleed lasts longer than 20 minutes despite taking all the necessary steps, seek medical help.Recurrent Nosebleeds: If you experience recurrent nosebleeds and you are unaware of the cause.Excessive Bleeding: If a nosebleed, like an injury to the nose, is accompanied by feeling lightheaded and weakness due to excessive blood loss, seek emergency assistance.Underlying Health Conditions: If you suffer from a health issue, like haemophilia, a clotting disorder, consult your doctor. Furthermore, if you're on medications, like blood thinners like aspirin, understand that they can result in frequent nosebleeds; your GP might change your medicines.Particular circumstances where you need to speak to your GPIf the child is under the age of 2�If you are anaemic and, as a consequence, experiencing symptoms such as shortness of breath and palpitationYou are on blood thinning medicationYou have a condition where your blood cannot clot properly leading to excessive bleeding*If your GP isn�t available, call the emergency helpline.Frequently Asked QuestionsWhat stops nosebleeds fast?Pinching your nose puts pressure on the blood vessels, which helps slow down and eventually stop the bleeding. Do not let go for at least 5 minutes.What is the primary cause of nose bleeding?Usually, nosebleeds are caused by frequent scratching on the inside of your nose, nose picking, and heating system indoors, which might lead to dry air, consequently causing nosebleedsWhat do hospitals use to stop nosebleeds?Hospitals frequently resort to two main treatments: nasal packing and cautery.What should you not do during a nosebleed?Avoid lying down or reclining if your nose is bleeding, if blood goes down your throat, it can result in vomiting and an upset stomachWrapping it upNosebleeds can be highly irritating and, at times, concerning, but understanding what causes them and how to manage them efficiently can help ease anxiety. Following proper treatment steps and effectively implementing preventative measures can reduce the frequency of nosebleeds. Stay informed about first aid for nose bleeding, and don�t hesitate to seek medical attention when necessary to ensure your health and safety.

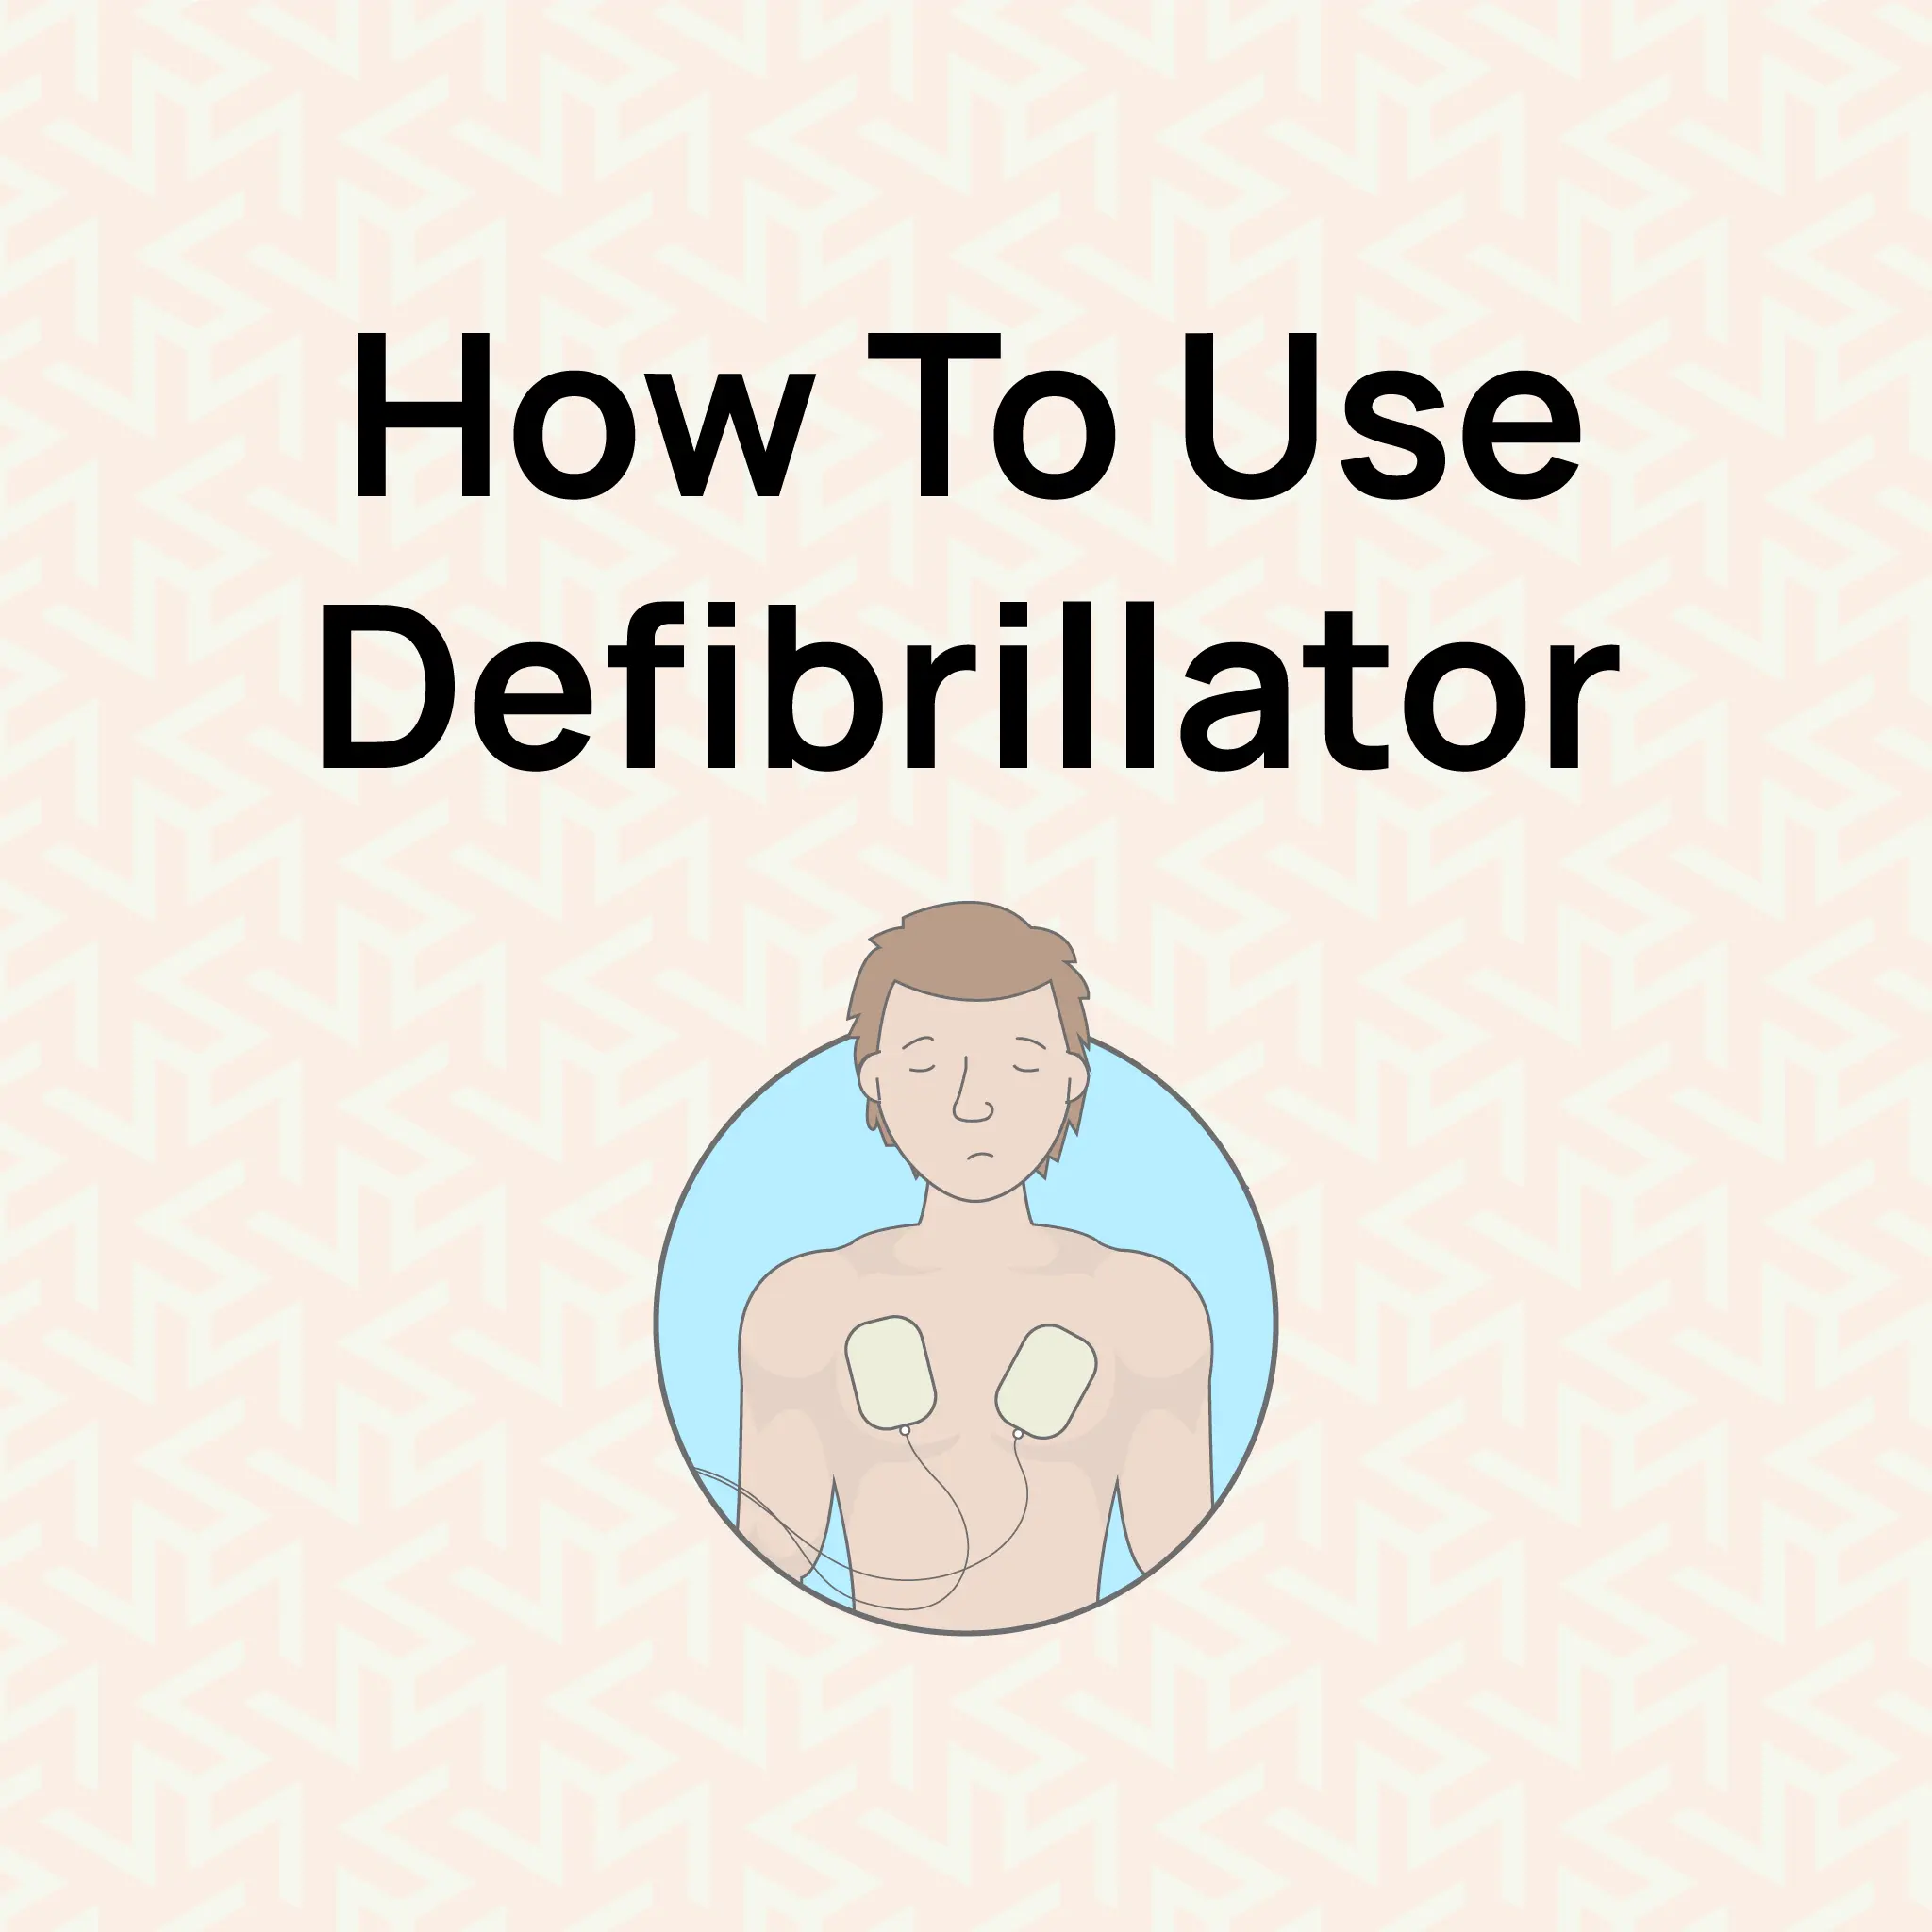
How to Use a Defibrillator
What is a DefibrillatorA defibrillator is an automated device that emits an electrical shock to get the heart beating again in case of cardiac arrest. These devices are not only available in ambulances; you can easily find them in public spaces like train stations. The device is also known as a defib or an AED (Automated External Defibrillator)How To Use a DefibrillatorAnyone who has the basic knowledge of first aid can use a defibrillator; turning the machine on will give clear voice commands. The device will give step-by-step instructionStep-by-step guide on how to use a defibrillatorIf the defibrillator is not within your reach start CPR, as soon as you have access to the device let it monitor the person�s heart� rhythmStep 1First, press the green button to switch on the defibrillator and then follow the instructions.Step 2Remove the person�s clothing from above the waist. This may include removing the bra, considering the victim is wearing one, the underwire might cause problems. You can do this by cutting off the straps using scissors, which you will find amongst other useful tools in the Defibrillator pack. If this makes you uncomfortable, just remember that this is a life-and-death situation.Step 3Next, peel off the pads and place them on the person�s skin, attaching one pad to each side of the chest.Step 4Now that the sticky pads are secure and properly placed on the victim, you must stop CPR. As mentioned above if the person is wearing a bra, you must remove it by slipping the straps down or cutting it off. Most defibrillator packs have tools like scissors to help you do this. It might feel odd or embarrassing, but do not let that stop you. Remember, this is a life-or-death situation.Step 5The device will monitor the person and decide whether a shock is needed. If the device detects that a shock is necessary, it will instruct you to press the �shock� button. Once you press the button, the defibrillator will shock the person. You should not touch the person while they are being shockedStep 6Once the shock has been given, the device will instruct you on whether to continue CPR. The AED may give a voice command such as �No shock advised, continue CPR�Step 7 If the command for CPR is given to you by the defibrillator, then continue with chest compressions. Stop only if the device gives a voice command instructing you to stop. It may do so to analyze the heartbeat again. You may stop with chest compressions if the person shows signs of life. .main{ border:3px solid #0f7c90; border-radius:20px; position: relative; font-family:roboto; font-weight: 400; color: #000; } .main-two{ position: absolute; top:-25px; left:45px; background-color:white; } .img-div{ border-radius : 100%; padding:2px 7px; background-color:#0f7c90; margin-right:5px; width: 50px; height: 50px; } .img{ width:30px; object-fit:contain; height:auto; border-radius : 100%; } @media only screen and (max-width: 600px) { .heading{ font-size:20px; } .img{ width:20px; object-fit:contain; height:auto; border-radius : 100%; } .img-div{ width: 40px; height: 40px; } .main-two{ left:25px; } } What does a defibrillator do, learn how a defibrillator works The proper use of an AED, in conjunction with knowledge of CPR and first aid, can save lives. Prioritizing the safety of others is essential. Equip yourself with these vital lifesaving skills. Check out our First Aid course and get certified today! FAQsWhat comes first, CPR or defibrillator?If the Defibrillator is not within your reach, the first step you need to take is to start CPR. As soon as you have a device, use it, let it analyze the heart's rhythm, and let it instruct you with voice commands on what needs to be done. If the defibrillator suggests that a shock be given to the person, then follow the instructions and proceed.What not to do with a defibrillator?Make sure you don�t have headphones dangling around your neck, and make sure you don�t put mobile phones or cordless phones, MP3 players or any other electric device within 6 inches of the defibrillatorWhat is the AED 3-minute rule?When a person collapses, every minute's delay decreases their chances of survival by 10 percent. To control the situation, it is recommended that you shock the victim within the first 3 minutes of their collapse. Research indicates that victims who receive a shock within the first 3 minutes are most likely to survive.

How to Stop Bleeding
Accidents can happen out of the blue and when they do occur, it isn�t uncommon to see a person bleeding, which can be extremely scary. It could be just a little scrape or something way more serious, irrespective of the severity of the wound it's super important to know what to do to stop the bleeding fast because that can really help in a pinch. Here's a quick and easy guide to handle those clumsy momentsTypes of Injuries and Associated BleedingCapillary BleedingThis is a type of bleeding that is not life-threatening and is mostly caused by cuts and abrasions. It involves a slow ooze of blood.Venous BleedingThis type of bleeding involves an injury to a vein and is associated with a controlled dark red flow of blood, this is venous bleedingArterial BleedingThis type of bleeding is more severe, a more fatal type of bleeding comes out with a bright red spray from the wound with every heartbeat. This kind of bleeding emanates from complete obstruction and thus calls for urgent medical intervention.What does it mean if the person looks pale, feels cold and is dizzy?If a person appears pale and feels cold and dizzy, it indicates that there isn�t enough blood flowing through their body. This can be life-threatening as it may lead to a lack of oxygen in the body�s tissues, potentially causing damage to organs or, in severe cases, a heart attack.This response to an injury is known as shock. If you suspect someone is bleeding heavily and going into shock, you need to apply pressure to the wound. Why? Simply to stop the blood from gushing out and prevent the person from going into shock. Understanding the initial DRABC steps in a primary survey is essential to ensure that you assess and address life-threatening situations in the correct order.If the blood is gushing out rapidly, you may need to consider techniques that may assist you in slowing down the bleeding instantaneously. If you are wondering what stops bleeding fast, the following directions may be useful.First, ensure that you are applying direct pressure on the wound. You must do so using a piece of gauze or a clean cloth. Hold the gauze in place until the bleeding stops.If there is excessive bleeding and it soaks through the gauze, grab another piece of cloth or gauze, put it on top of it, and continue applying pressure to the open wound.If the placement of the wound is on the arm or leg, you must raise the limb so that it inclines above the heart. This will slow down the bleeding.Once the bleeding has slowed down or stopped, wash your hands and then proceed with cleaning and dressing the woundMake sure that you use a tourniquet only if the bleeding is severe and isn�t stopping with direct pressureWhen to Seek Medical HelpThere may be instances where you might find yourself in a helpless situation and your only option is to seek medical help; the list below gives insight into when and why you�d need to seek medical helpIf the blood keeps gushing out after 10 minutes of continuously applying pressureIf the wound is gaping and the muscle or bone is visibleIf there is a sharp object embedded deep into the woundIf you suspect that there is arterial bleedingHow do you recognise the signs of Haemorrhage?External bleeding is more prominent; however, if the bleeding is internal, this could be a sign of a haemorrhage. You can easily recognise if it's a haemorrhage. The signs include shallow breathing, chest pain, low blood pressure, and sweating, and the person might be in a daze while feeling dizzy.If the injured person loses consciousness due to excessive internal bleeding, pay close attention to the discolouration of the lips and fingernails; if they start turning blue or purple, then you need to call for help immediately.When Should You See A Doctor?Internal bleeding usually requires immediate medical attention except for minor injuries like those that cut the blood vessels but are extremely close to the surface of the skin.Often trivial matters turn into life-threatening situations. When we talk about a haemorrhage, seeing a doctor, irrespective of how minor the case is, should be a priority; Furthermore, research indicates that severe bleeding out cases result in death within 6 hours of admitting the injured person to the hospital.As soon as internal bleeding is detected, it is imperative that the patient be taken to the hospital immediately; every second counts; if going to the hospital is not an option, then call the emergency service. .main{ border:3px solid #0f7c90; border-radius:20px; position: relative; font-family:roboto; font-weight: 400; color: #000; } .main-two{ position: absolute; top:-25px; left:45px; background-color:white; } .img-div{ border-radius : 100%; padding:2px 7px; background-color:#0f7c90; margin-right:5px; width: 50px; height: 50px; } .img{ width:30px; object-fit:contain; height:auto; border-radius : 100%; } @media only screen and (max-width: 600px) { .heading{ font-size:20px; } .img{ width:20px; object-fit:contain; height:auto; border-radius : 100%; } .img-div{ width: 40px; height: 40px; } .main-two{ left:25px; } } Proper knowledge of how to stop bleeding combined with the ability to perform CPR and being equipped with knowledge regarding First aid in general can save a life. Let�s make the safety of others a priority. Equip yourself with lifesaving skills Join our Emergency First Aid at Work course and get certified now. Conclusion Ensure that you maintain a calm demeanour while tending to someone who is bleeding; knowing how to stop bleeding, whether it's from a minor cut or scrape or from a deeper wound, is a critical skill to possess, one that can save lives. With this skill, you are equipped to handle various emergencies confidently. Furthermore you�ll be able to respond effectively in an emergency. Be a useful individual in the sense that you�ll easily be able to help those in need and contain a difficult situation. Make sure you keep yourself up-to-date and keep refreshing your skills.
Three P�s In First Aid
Imagine being in a situation where an accident or a medical emergency occurs, instead of panicking and wondering what to do you can efficiently manage the situation by familiarising yourself with the 3 P�s of first aid. Let�s have a close look at the three P�s of first aid and understand how they can be helpful when faced with an emergency.What are the 3 P�s in first aid?The 3 P�s of First aid stands for Preserve Life, Prevent Deterioration and Promote Recovery. Familiarising yourself with the 3 P�s is arguably the most useful knowledge a first aider can equip themselves with, The primary aim of these techniques is to prevent serious injuries, and provide first aid. Let's take a closer look at each of the 3 P�sPreserve Life: The First Step to SafetyThe optimal solution to handling an emergency is to have prevention measures in place so the likelihood of an accident is exponentially minimised. By implementing the first step, you are essentially creating a safer environment. Below you will find some key points that will help you understand the importance of the principles of first aid:Awareness: Scan and take in your surroundings. Being vigilant and aware of potential hazards can be helpful, for instance if someone is having an allergic reaction and the presence of mold is prevalent in the area that might help you understand the cause, understanding the cause inadvertently helps in knowing what needs to be done, Another example of potential hazards could be exposed wires) being vigilant can be efficacious in preventing emergencies, irrespective of the location, whether you�re at home, out camping or at work.Being well informed: Educate yourself about the risks that you are most likely to encounter within your surroundings. A prime example would be knowing how to give CPR or control excessive bleeding. With the right information and if implemented accurately, it can control a situation before the damage is done.Ready to take action: You need to have the basic first aid supplies with you, and these supplies should be easily accessible. A first aid kit that has everything a first aider could need in an emergency can save lives during an emergency.Prevent DeteriorationThe steps below will be invaluable for a first-aider in an emergency.Carefully evaluate the environment: Before you approach the victim, examine the environment for any hazards like oncoming traffic, loose cables or a building that is not stable.� Familiarise yourself and implement the ABC Of first aid:A (Airway): Check if the airway is clear. If not, it may need to be opened. Quickly assess if the airway is blocked, and if it is, take the appropriate steps to remove the blockage so that air can flow freely.B (Breathing): Observe the movement of the chest and notice if it is moving while listening closely for the sound of breathing, even if it's faint.C (Circulation): While checking the airway and breathing do not waste any time and check the pulse, if there is no pulse start performing CPR.You may often find yourself in a helpless situation despite being a trained first aider. The optimal solution is to call emergency services, provide them with clear and concise information about the steps you took, and let them handle the situation. .main{ border:3px solid #0f7c90; border-radius:20px; position: relative; font-family:roboto; font-weight: 400; color: #000; } .main-two{ position: absolute; top:-25px; left:45px; background-color:white; } .img-div{ border-radius : 100%; padding:2px 7px; background-color:#0f7c90; margin-right:5px; width: 50px; height: 50px; } .img{ width:30px; object-fit:contain; height:auto; border-radius : 100%; } @media only screen and (max-width: 600px) { .heading{ font-size:20px; } .img{ width:20px; object-fit:contain; height:auto; border-radius : 100%; } .img-div{ width: 40px; height: 40px; } .main-two{ left:25px; } } How To Administer CPR ? Don�t wait until an emergency strikes! Understand the 3 principles of first aid, our basic first aid course breaks down how the 3 principles can efficiently manage a difficult situation related. Get certified today and save lives. Promote Recovery:Appropriate measures: The initial step is to act quickly and do what you deem best to control the emergency. The aim is to ensure the person�s condition doesn�t get worse.Don�t Panic: Your demeanour can have a direct impact on the mental state of the victim, so it is absolutely necessary that you remain calm, speak in a reassuring manner.Documentation: once the person is stable, start documenting the incident and your steps. This information can be critical for emergency responders when they arrive.The third and last step is the three P's in promoting recovery; once you�ve stabilised the hazardous situation, it is time to take action; this is a pivotal step in the 3 P�s of First Aid.First, you need to follow the protocol, make use of everything you have learned and put it to use to the best of your ability this would include a plethora of techniques, these techniques include, controlling extensive bleeding from deep wounds, treating the patient for shock and even performing CPR when necessary.The next step is a little tricky, and not a lot of people who are proficient at first aid might be able to maintain a brave front when faced with adversity. The purpose behind this step is that your overall demeanour plays a pivotal role in how the victim responds. Stay calm, and speak to them reassuringly.Document everything. You want to document the steps you took for the paramedics and the medical staff. It�ll aid them in proceeding with appropriate care.The Importance of the 3 Ps in First AidThe 3 P�s of first aid are essential to an immediate emergency response but by thoroughly understanding how to preserve life, prevent deterioration and how to promote recovery you can make a significant impact and potentially save a life. Who should learn the 3 P�s in First Aid?Anyone can benefit from the 3 P�s in First aid but it is extremely useful for) Medical staff- this includes nurses, doctors,and paramedics) Employees working at construction sites or in an industry where accidents are more likely to occur) Parents, teachers and day care providers) Lifeguards and athletic coachesAnyone who is likely to deal with an injury can benefit from learning about the 3 P�s in First aid.ConclusionFamiliarising yourself with the three first aid principles can empower you to respond effectively in an emergency. You can play a prominent role when every second counts by cultivating a solution-oriented mind-set, learning to assess a situation critically, and knowing how to act Promptly.These principles can be useful, as you will understand things better and improve your abilities. The more thoroughly you understand the 3 P�s of first aid, the greater the chances of saving someone�s life. Embrace the knowledge and be prepared to save lives.
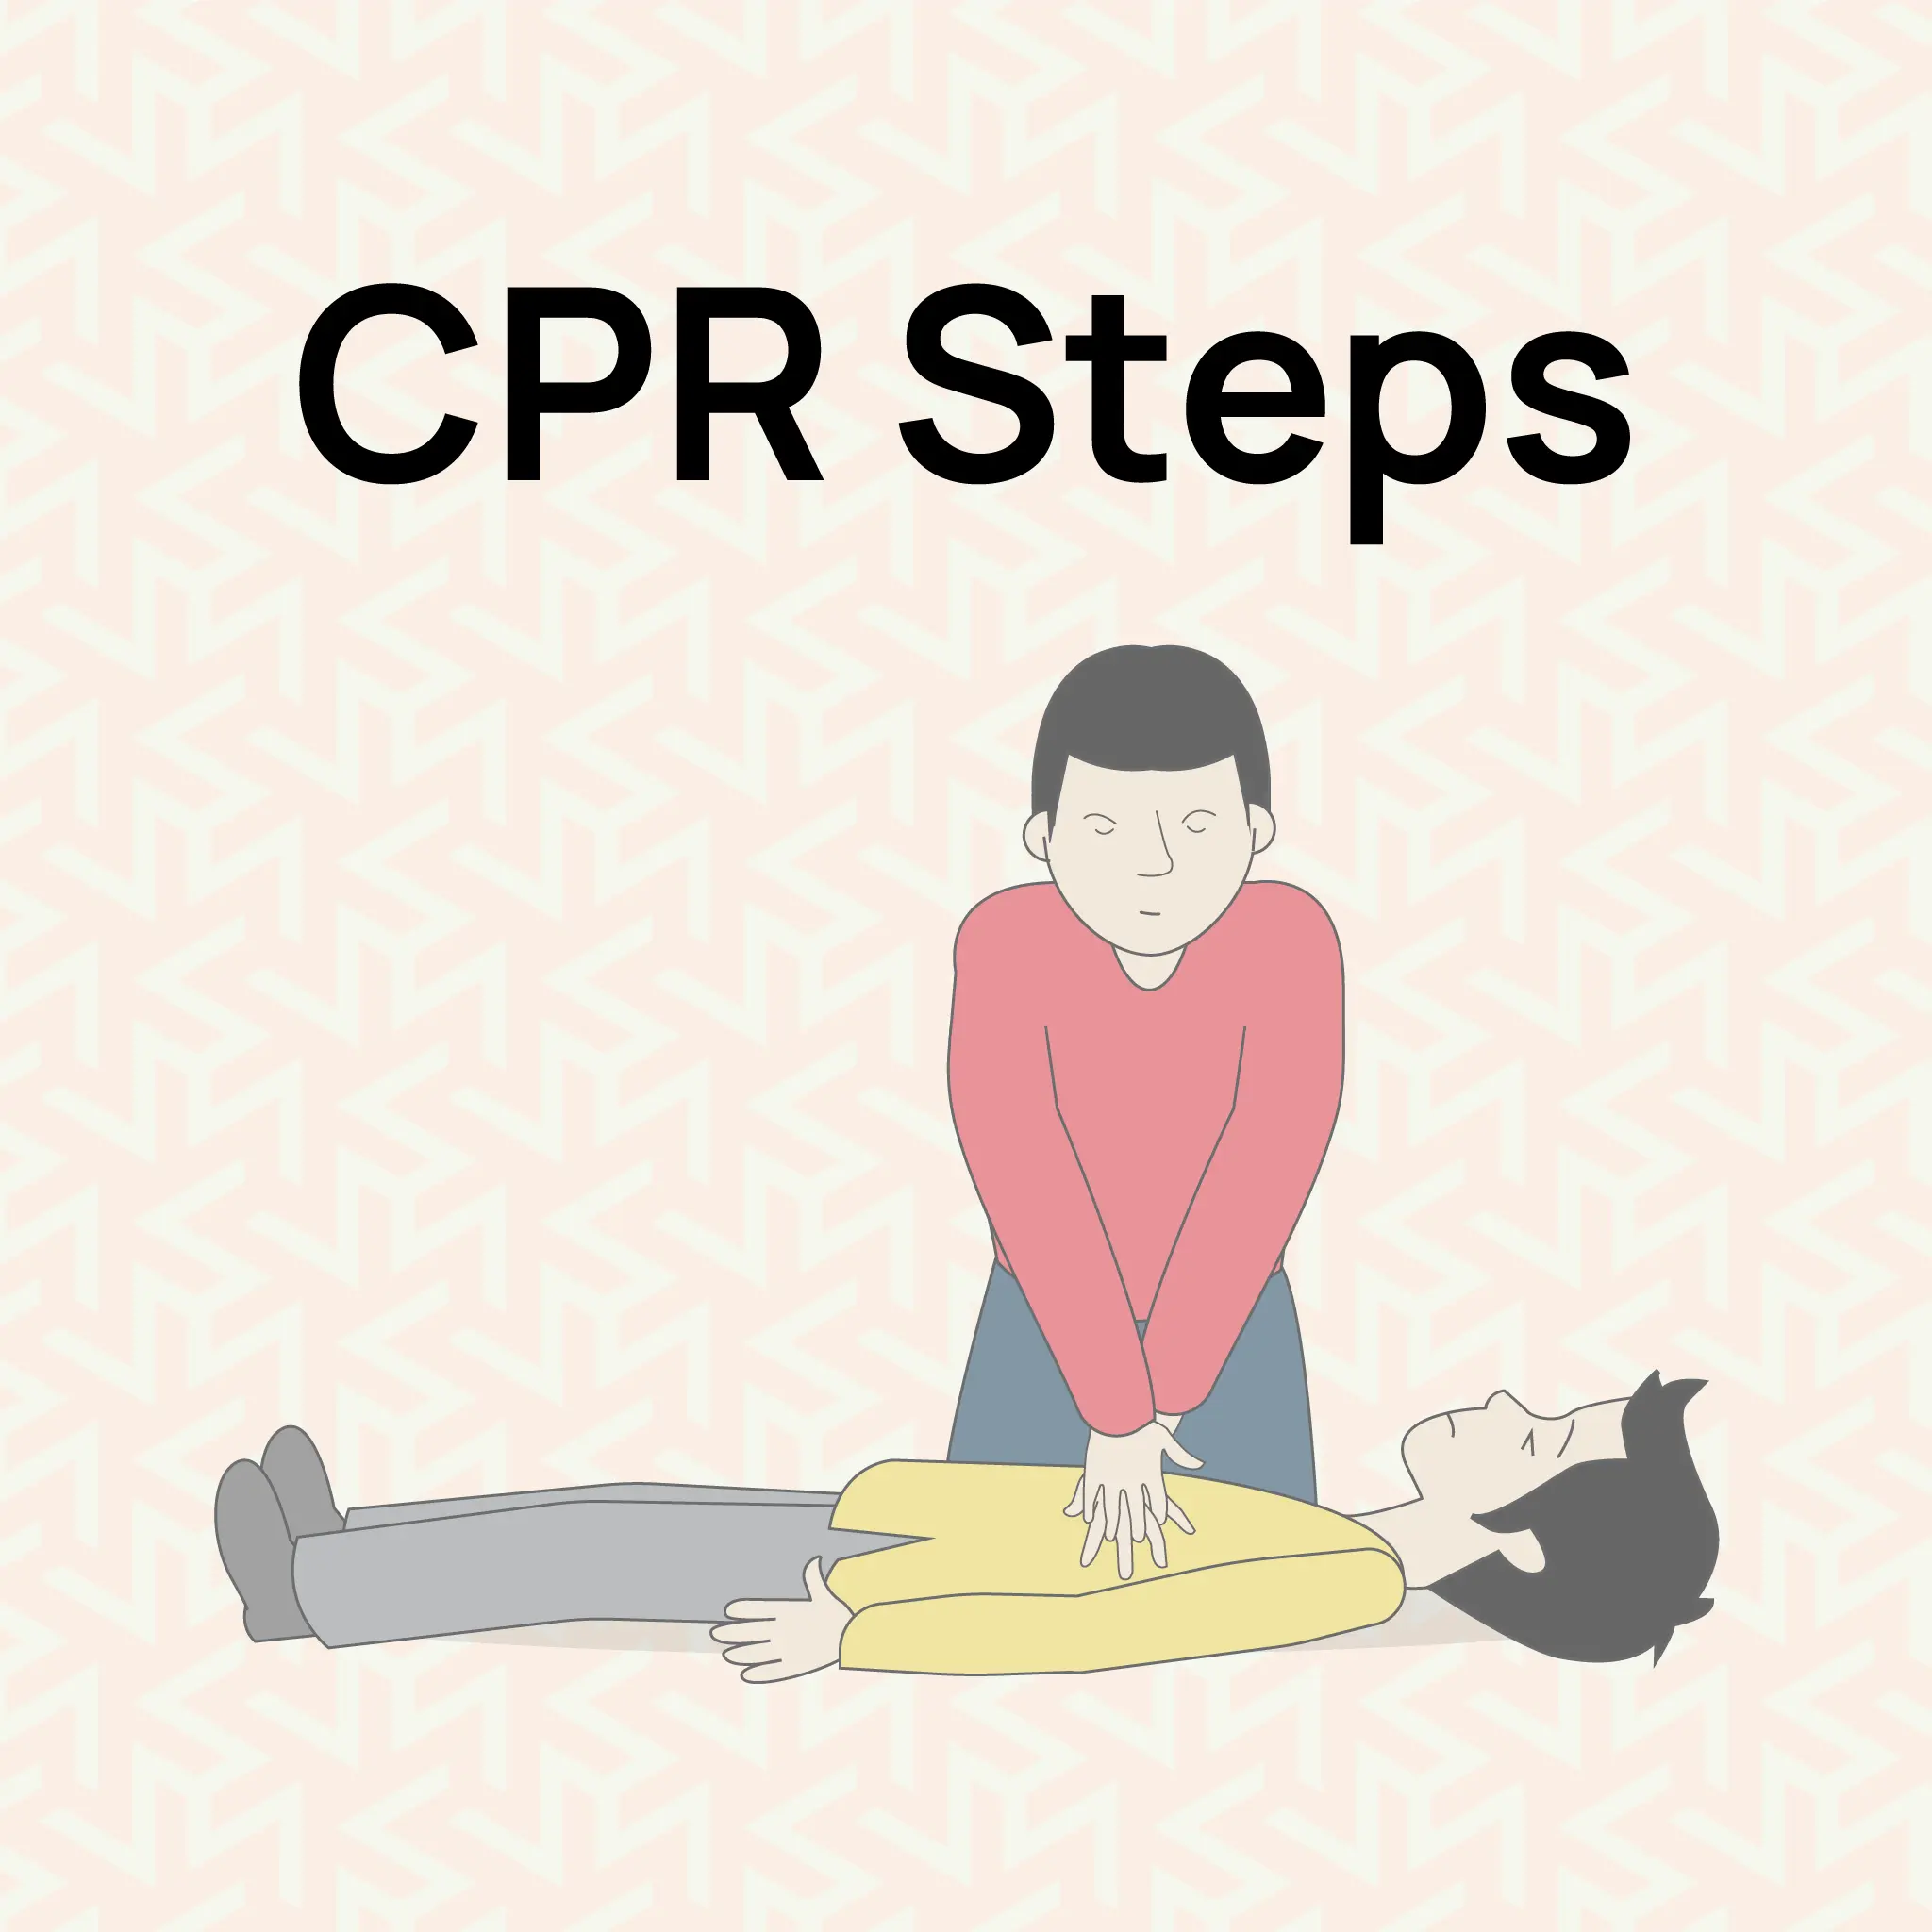
CPR STEPS: Essential Procedures
Cardiopulmonary resuscitation (CPR) is an essential life saving technique that can drastically improve the chances of survival in emergencies such as a cardiac arrest.Knowing CPR steps can empower you to act quickly and effectively in a critical situation.Let�s break down the 7 steps of CPR.What Are the 7 Steps of CPR?Step 1: Assess the SituationMake sure that the environment is safe for your own self as well as the victim. Start by attempting to wake the person up by shaking them gently and at the same time checking if everything is okay.Step 2: Call for HelpIn the case the person does not respond, scream for help or call the local emergency line. If there are other people around, order someone to call, while you start Cardio Pulmonary Resuscitation.Step 3: Open the AirwayPush the head backward by placing one hand on the forehead while holding the other hand�s palm under the victim�s chin. This helps in opening up the airway.Step 4: Check for BreathingObserve for rise and fall of the chest, listen for sounds of breathing or feel for breath on the cheeks. If the person is not breathing normally, go to the next step.Step 5: Begin Chest CompressionsPlace your hands on the center of the chest then join your hands with your fingers intertwined by placing one hand above the other and ensure that your arms are straight. Push down hard and fast. You�re probably wondering how many chest compressions are allowed while performing CPR? The guideline that is used most often is 30 chest compressions then 2 breaths.Step 6: Rescue BreathsGive 30 chest compression and then deliver 2 ventilations. Take the patient�s nose between your thumb and index finger and close it; use your mouth to seal the patient�s lips and blow gently into the patient�s mouth so that you see the chest rise at the end of one second. Do this for the second breath as well.Step 7: Continue CPRContinue the step of 30 compressions and 2 breaths until the help arrives or there is a pulse.Furthermore, being familiar with the recovery position along with knowledge of CPR can do wonders when it comes to containing a situation.How is CPR Performed?CPR is generally given in cycles of chest compressions and rescue breaths although rescue breaths can be omitted at times. In adults, the compression to breath ratio is 30:2. For infants and children it is the same if you are on your own, but if you have help you can convert the ratio to a 15:2.How Many Compressions Per Minute?The proper rhythm of chest compressions is between 100 to 120 pressure in one minute. Additionally when helping someone in an emergency always start with a primary survey which basically entails a quick assessment of the scene and the person in need of help. .main{ border:3px solid #0f7c90; border-radius:20px; position: relative; font-family:roboto; font-weight: 400; color: #000; } .main-two{ position: absolute; top:-25px; left:45px; background-color:white; } .img-div{ border-radius : 100%; padding:2px 7px; background-color:#0f7c90; margin-right:5px; width: 50px; height: 50px; } .img{ width:30px; object-fit:contain; height:auto; border-radius : 100%; } @media only screen and (max-width: 600px) { .heading{ font-size:20px; } .img{ width:20px; object-fit:contain; height:auto; border-radius : 100%; } .img-div{ width: 40px; height: 40px; } .main-two{ left:25px; } } Learn CPR and Save Lives! Knowing CPR can make a critical difference in emergencies. Our Comprehensive course breaks down the steps you need to know to respond effectively Enroll Now for Emergency First Aid at Work training and save lives. ConclusionBeing well informed on the steps of CPR can make a significant difference in dire situations. The CPR procedure you follow can prevent the medical condition from deteriorating further until medical help arrives. With a thorough comprehension on how to perform CPR correctly and how many compressions should be given, you prepare yourself to save lives. Always consider taking a certified CPR course for hands-on training and practice, ensuring you�re ready when it matters most.

Understanding Epilepsy
What is Epilepsy?Epilepsy is a disease that is widespread and numerous people across the whole world suffer from it. It is a brain disorder that causes recurring seizures. Anyone, irrespective of their age, sex or race can develop epilepsy.What is a Seizure?A seizure is when damaged brain cells send an excessive surge of electrical activity in the brain. It is important to note that Epilepsy is often referred to a �Seizure Disorder�This disorder can manifest at any age although it is common for children or elderly people in their sixties to have seizures. To be diagnosed with epilepsy, usually a person has to have more than one seizure that is unprovoked or the probability of getting a seizure is high.Types of SeizuresSeizures are generally classified into two main categories:Focal (Partial) Seizures:Simple focal seizures: Influence the smallest section of the brain without inducing a loss of consciousness.Complex focal seizures: May result in changes to the level of consciousness.Generalized Seizures:Absence seizures: Short lapses that are often confused with daydreaming.Tonic-clonic seizures: Include a loss of consciousness, muscle stiffening, and jerking movements.Atonic seizures: Lead to a loss of skeletal muscle tone, making people prone to falling.Myoclonic seizures: Characterised by sudden, brief, involuntary movements, also known as muscle spasms.What Causes Seizures?Seizures can have various causes, including:Genetic factorsBrain injuries or traumaDevelopmental disordersInfections affecting the brainStrokeBrain tumorsAlzheimer's diseaseAbnormal levels of substances like sodium or blood sugarDrug or alcohol abuseWhat Causes Seizures in Adults with No History?Epilepsy is an illness where fits can begin in adults as well as children though the adults have no past records of seizures. Possible causes include:Undiagnosed brain tumorsStrokeHead injuriesOther conditions such as; meningitis or encephalitisAutoimmune disordersSevere alcohol withdrawalUse of or contact with medicinal. Interaction with drugs or other medication.Therefore, often it is scary for the first time, especially when it happens to an adult, it is better to be examined by a doctor.What to Do If Someone Has a SeizureIf you witness someone having a seizure:Do not panic and time the seizure.Remove any nearby objects that could cause injury.Place something soft under their head.Gently guide the person to the ground if they are not already there.Avoid holding the person down or putting anything in their mouth.Stay with the person until the seizure ends and they regain awareness.If a child is having a seizure, position them on their side to help with breathing and prevent choking.Call an ambulance if the seizure lasts longer than half an hour or if it is their first seizure.Learn more about the responsibilities of a First aider.What Diseases Cause Seizures?Several diseases and conditions can lead to seizures, including:EpilepsyBrain infections (like meningitis and encephalitis)Brain tumorsStrokeAlzheimer's diseaseMultiple sclerosisLupusCerebral palsyPhenylketonuria (PKU)What is Absence Epilepsy?Petit mal epilepsy also known as absence epilepsy is a type of epilepsy which results in small epilepsy that subsides quickly and leads to a temporary loss of consciousness. These seizures are short in duration and a person can suffer from them multiple times in the day.These sort of seizures last for a few seconds. Most of the cases start in childhood, or adolescence and the early manifestations are sometimes regarded as mere daydreaming or attention deficit disorders.`Can Epilepsy Be Cured?Epilepsy can only be treated to a certain extent; however, if diagnosed early and well taken care of, most people suffering from the disease can live normal lives. Treatment options include:Anti-Epileptic Drugs (AEDs): It is usually the first-line treatment of choice for most of the epilepsy patients out there.Surgery: It is fairly likely that there may be ways to have the part of the brain taken out via surgical procedure.Brain Implant Options: Vagus nerve stimulation (VNS) uses electrical signals that are sent to help regulate the occurrence of seizures.Ketogenic Diet: May help in controlling seizures in some people especially children.Responsive Neurostimulation: This is a chip which is placed in the head. It can identify instances of seizure and even act efficiently to put a halt to it.Working with a healthcare team may result in developing a treatment plan that will be suitable for each patient.Living with Epilepsy It is also worth emphasising that most people experiencing epilepsy can work or study, go out with friends or travel, proving that epilepsy does not necessarily negatively affect a person�s quality of life. Here are some tips for handling epilepsy: It is imperative to have information on what causes certain types of seizures to occur. Exercise according to the fitness regimen which your doctor has prescribed for you. Diminish stress by practising different methods of relaxation. If the doctor has given you a prescription make sure you take those medicines timely Inform people that are around regarding some of the things that they should do in case of a seizure. Getting in touch with other people who may be going through tougher situations may also help. .main{ border:3px solid #0f7c90; border-radius:20px; position: relative; font-family:roboto; font-weight: 400; color: #000; } .main-two{ position: absolute; top:-25px; left:45px; background-color:white; } .img-div{ border-radius : 100%; padding:2px 7px; background-color:#0f7c90; margin-right:5px; width: 50px; height: 50px; } .img{ width:30px; object-fit:contain; height:auto; border-radius : 100%; } @media only screen and (max-width: 600px) { .heading{ font-size:20px; } .img{ width:20px; object-fit:contain; height:auto; border-radius : 100%; } .img-div{ width: 40px; height: 40px; } .main-two{ left:25px; } } Understanding epilepsy is crucial for supporting those affected and fostering a more inclusive community. Dive into our article to learn about its causes, symptoms, and how you can help. Join our First Aid at Work Training Course, get certified now! Together, we can make a difference! ConclusionIf treated well, many patients with epilepsy are capable of leading productive lives. For any signs of seizures or epilepsy, it is advisable to consult your doctor or any other qualified healthcare provider.
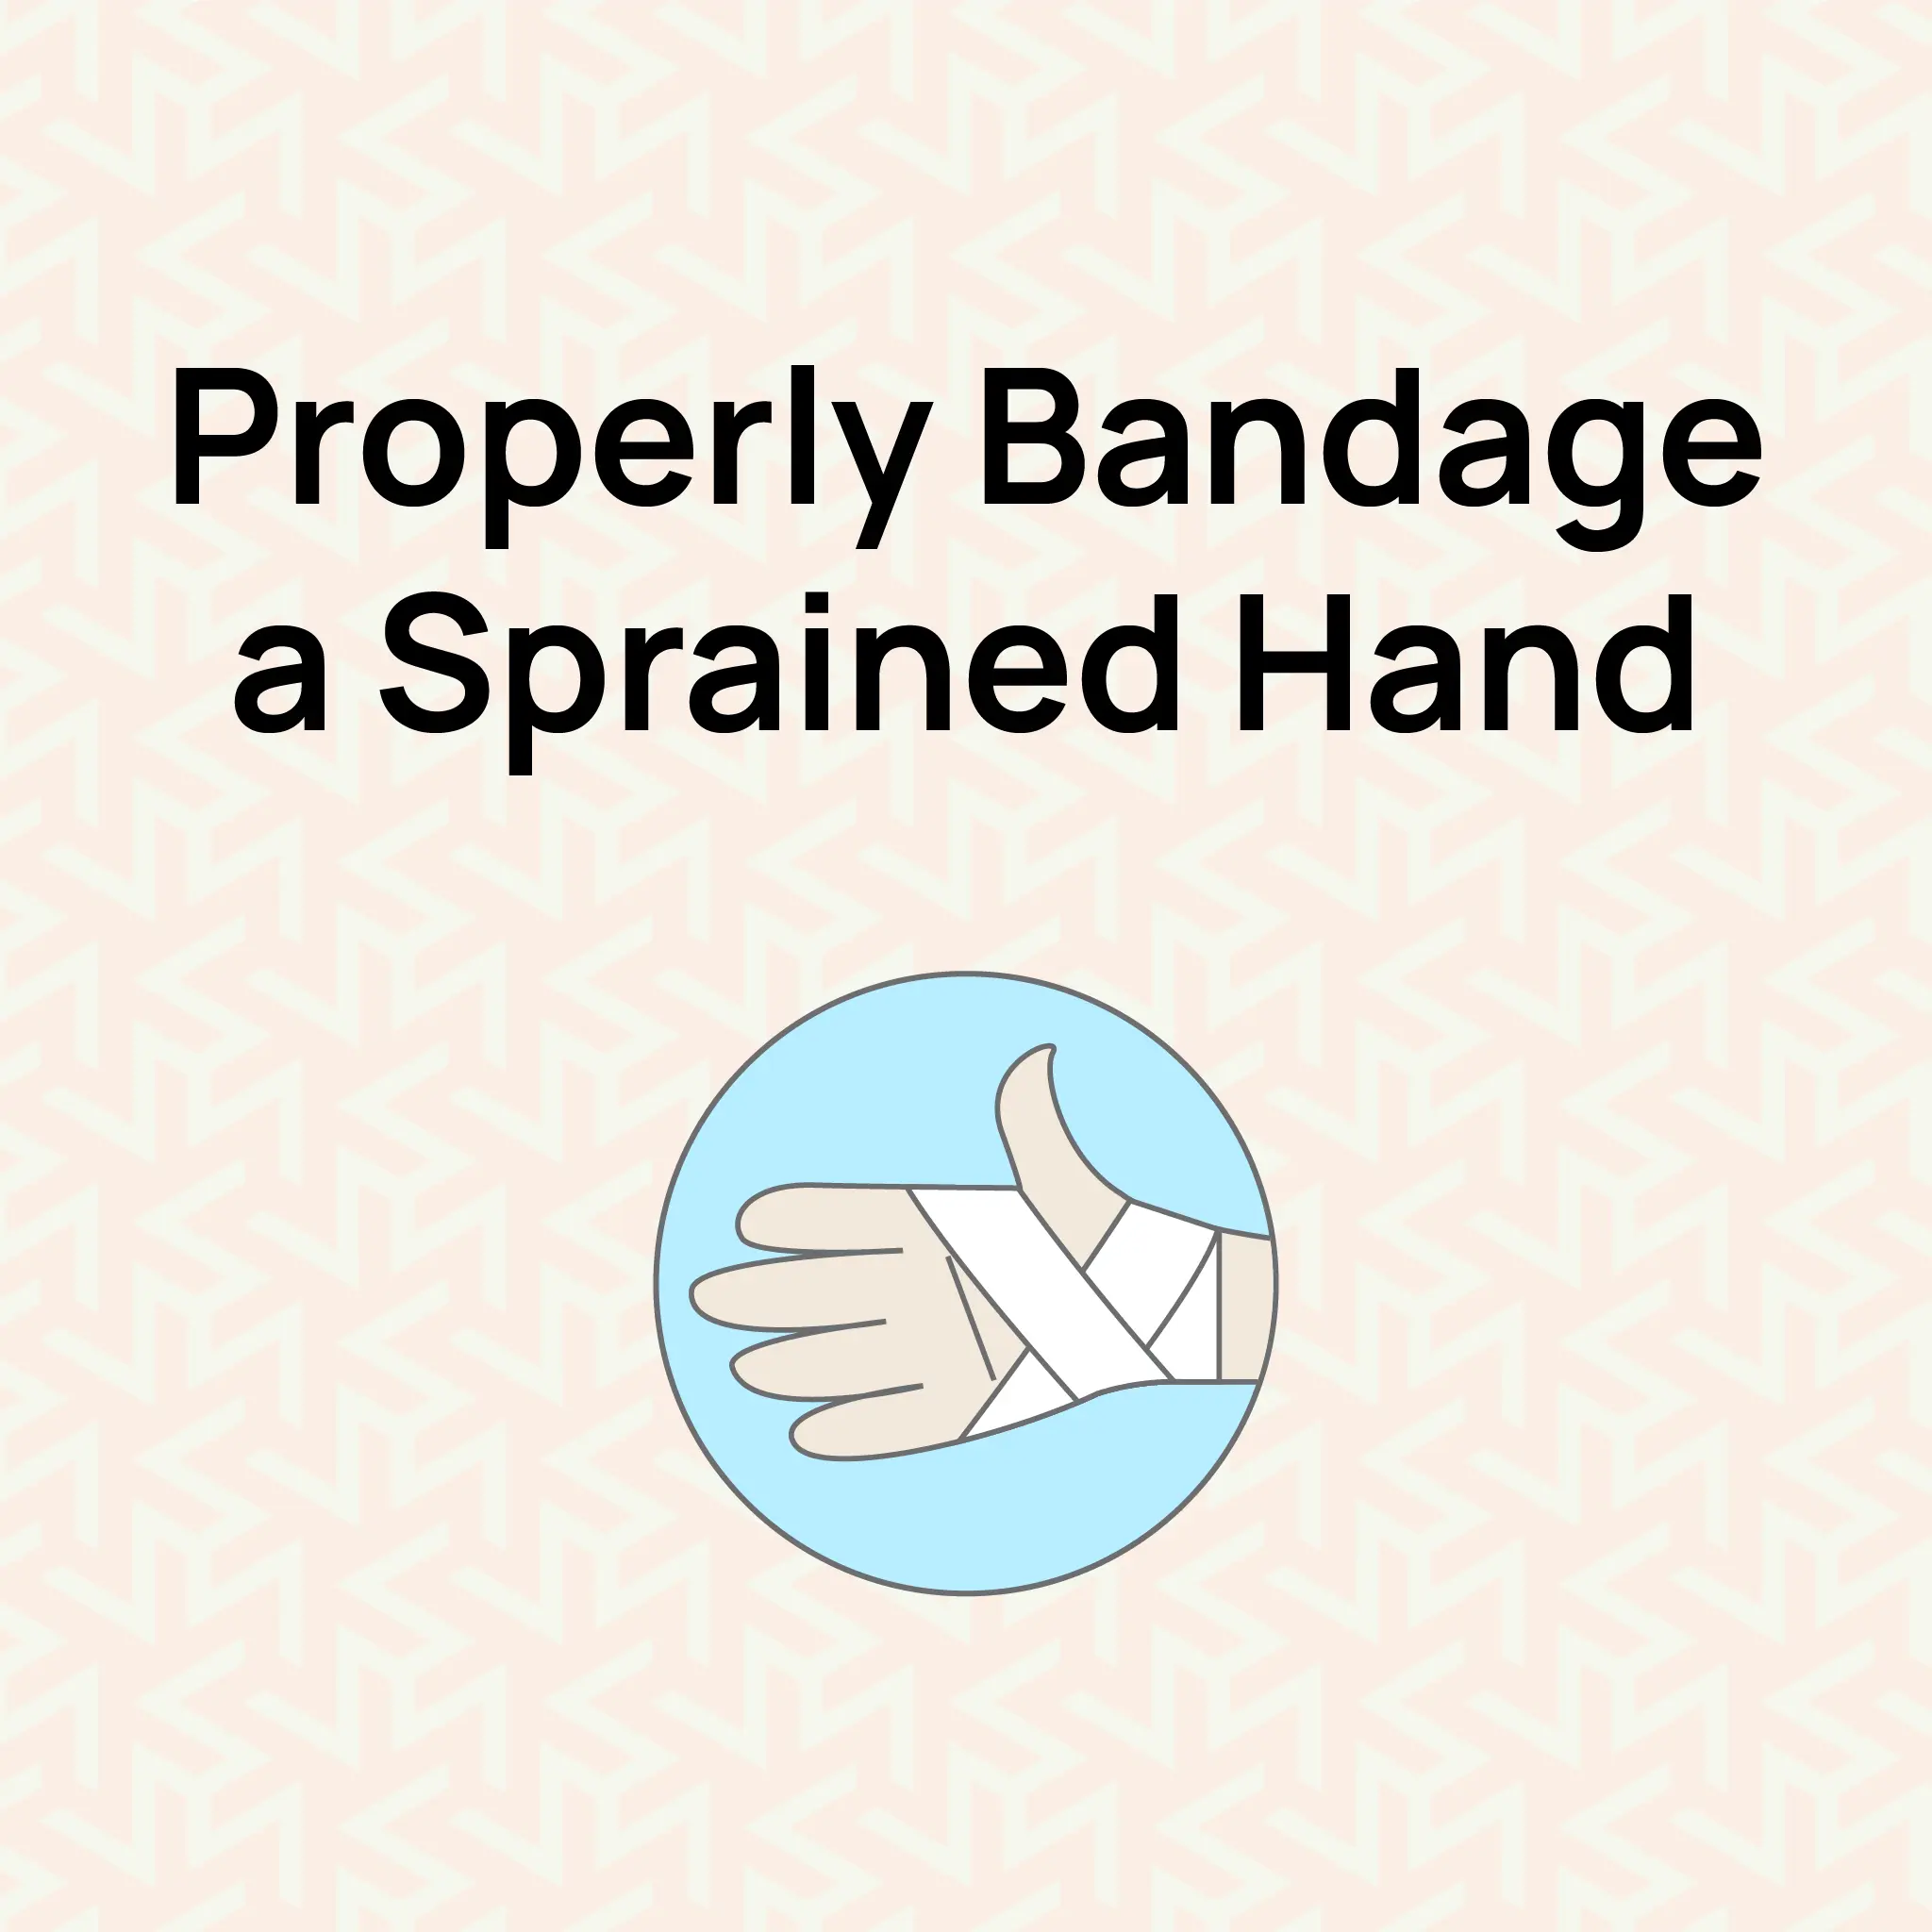
Hand Bandage
Injuries are not something you can predict, and therefore, it is imperative that you know how to protect yourself after an injury has occurred. A sprained hand is a common phenomenon. Therefore, it is essential to know about the implications of using certain stretcher bands in order to help heal and support a sprained or injured hand.A sprain occurs when the ligaments, the tough bands of tissue connecting bones at a joint-are stretched or torn. Common symptoms of a sprained hand include pain, swelling, bruising, and difficulty moving the affected area. Immediate care is essential to manage these symptoms and promote healing.How to Bandage a Sprained WristForcing a sprained wrist into a cast will only contribute to the swelling, while stabilizing it provides solid confinement that aids in healing. Here�s a step-by-step guide on the principles of first aid for treating a sprained wrist:Gather Your Supplies: Essential items include a sterile bandage, several gauze pads, adhesive tape, and a pair of scissors. An elastic bandage for support is particularly effective.Position Your Hand: To reduce swelling, keep your hand above the level of your heart. After washing, dry it on a pillow or any soft surface.Apply Ice: Before bandaging, apply ice to the injured area for about 15-20 minutes, using a cloth to cover the ice pack. This step aligns with the aims of first aid by minimizing swelling and discomfort.Prepare the Bandage: If there�s any exposed skin, place a gauze pad directly over the affected area first. Wrap the bandage around the painful wrist, overlapping slightly as you go. It should be snug but not tight enough to stop blood circulation. Continue wrapping up to the wrist and a bit on the hand for added support.Secure the Bandage: Finally, use adhesive tape to fasten the end of the bandage securely. Ensure it�s tightly fixed to prevent movement, but not so tight that it hinders blood flow.Check for Comfort: Encourage the injured individual to wiggle their fingers. If they experience numbness or significant pain, the bandage may be too tight, which is crucial to assess in any first aid scenario.By following these steps, you can effectively apply the three Ps of first aid and promote healing while ensuring comfort.How to Wrap a Wrist EffectivelyWhen wrapping a wrist, keep in mind the following tips:Use the Figure-Eight Technique: To some extent, this technique offers support but does, at the same time, offer a modicum of freedom. The bandage should loop around the wrist first, then over the back of the hand.Continue the process of wrapping the bandage in an 8 figure motionLayer for support: If your wrist requires more support, it is recommended that you layer the bandage. Try not to put too much pressure on the wrist.Check the bandage regularly. When the swelling is minimized, a new dressing or adjustment of the bandage may be required.How to Apply a Roller Bandage to the HandFirst you wrap the hand from a little above the wrist and make it pass around the wrist twiceMake sure the palm of your hand is facing down. Start with the little finger and then across. Make sure you do not cover the first knucklesMake sure that each layer covers at least half of the previous one as you work across the palm and thumb, creating the Figure 8 pattern. Continue the process until the bandage is ultimately used up. Make sure you do not cover the thumb unless the wound is expanding over till the thumbOnce the bandage is completely used up use either a tape or a clip to secure it, so that it doesn�t open up. .main{ border:3px solid #0f7c90; border-radius:20px; position: relative; font-family:roboto; font-weight: 400; color: #000; } .main-two{ position: absolute; top:-25px; left:45px; background-color:white; } .img-div{ border-radius : 100%; padding:2px 7px; background-color:#0f7c90; margin-right:5px; width: 50px; height: 50px; } .img{ width:30px; object-fit:contain; height:auto; border-radius : 100%; } @media only screen and (max-width: 600px) { .heading{ font-size:20px; } .img{ width:20px; object-fit:contain; height:auto; border-radius : 100%; } .img-div{ width: 40px; height: 40px; } .main-two{ left:25px; } } How to use a Hand Bandage ? knowing how to bandage a sprained hand properly can significantly improve the injury. It is a useful skill which helps in preventing injury and aiding recovery. If you want to gain the skills and confidence to handle any hand injury- whether at home, at work, or on the go- our Emergency First Aid at Work Course is the perfect place to start. This expert-led course will teach you step-by-step techniques for applying hand bandages and providing essential first aid in various situations. ConclusionLearning how to wrap a sprained hand is one crucial factor that can be extremely helpful when treating an injured hand. Following this step-by-step guide would enable you to be better positioned to offer proper care to an injured hand or wrist. Seek help from a professional healthcare provider if the injury appears severe or is worsening; if you receive or give proper care swiftly, your injury will recover quickly, and you�ll be able to get back to your daily activities soon.
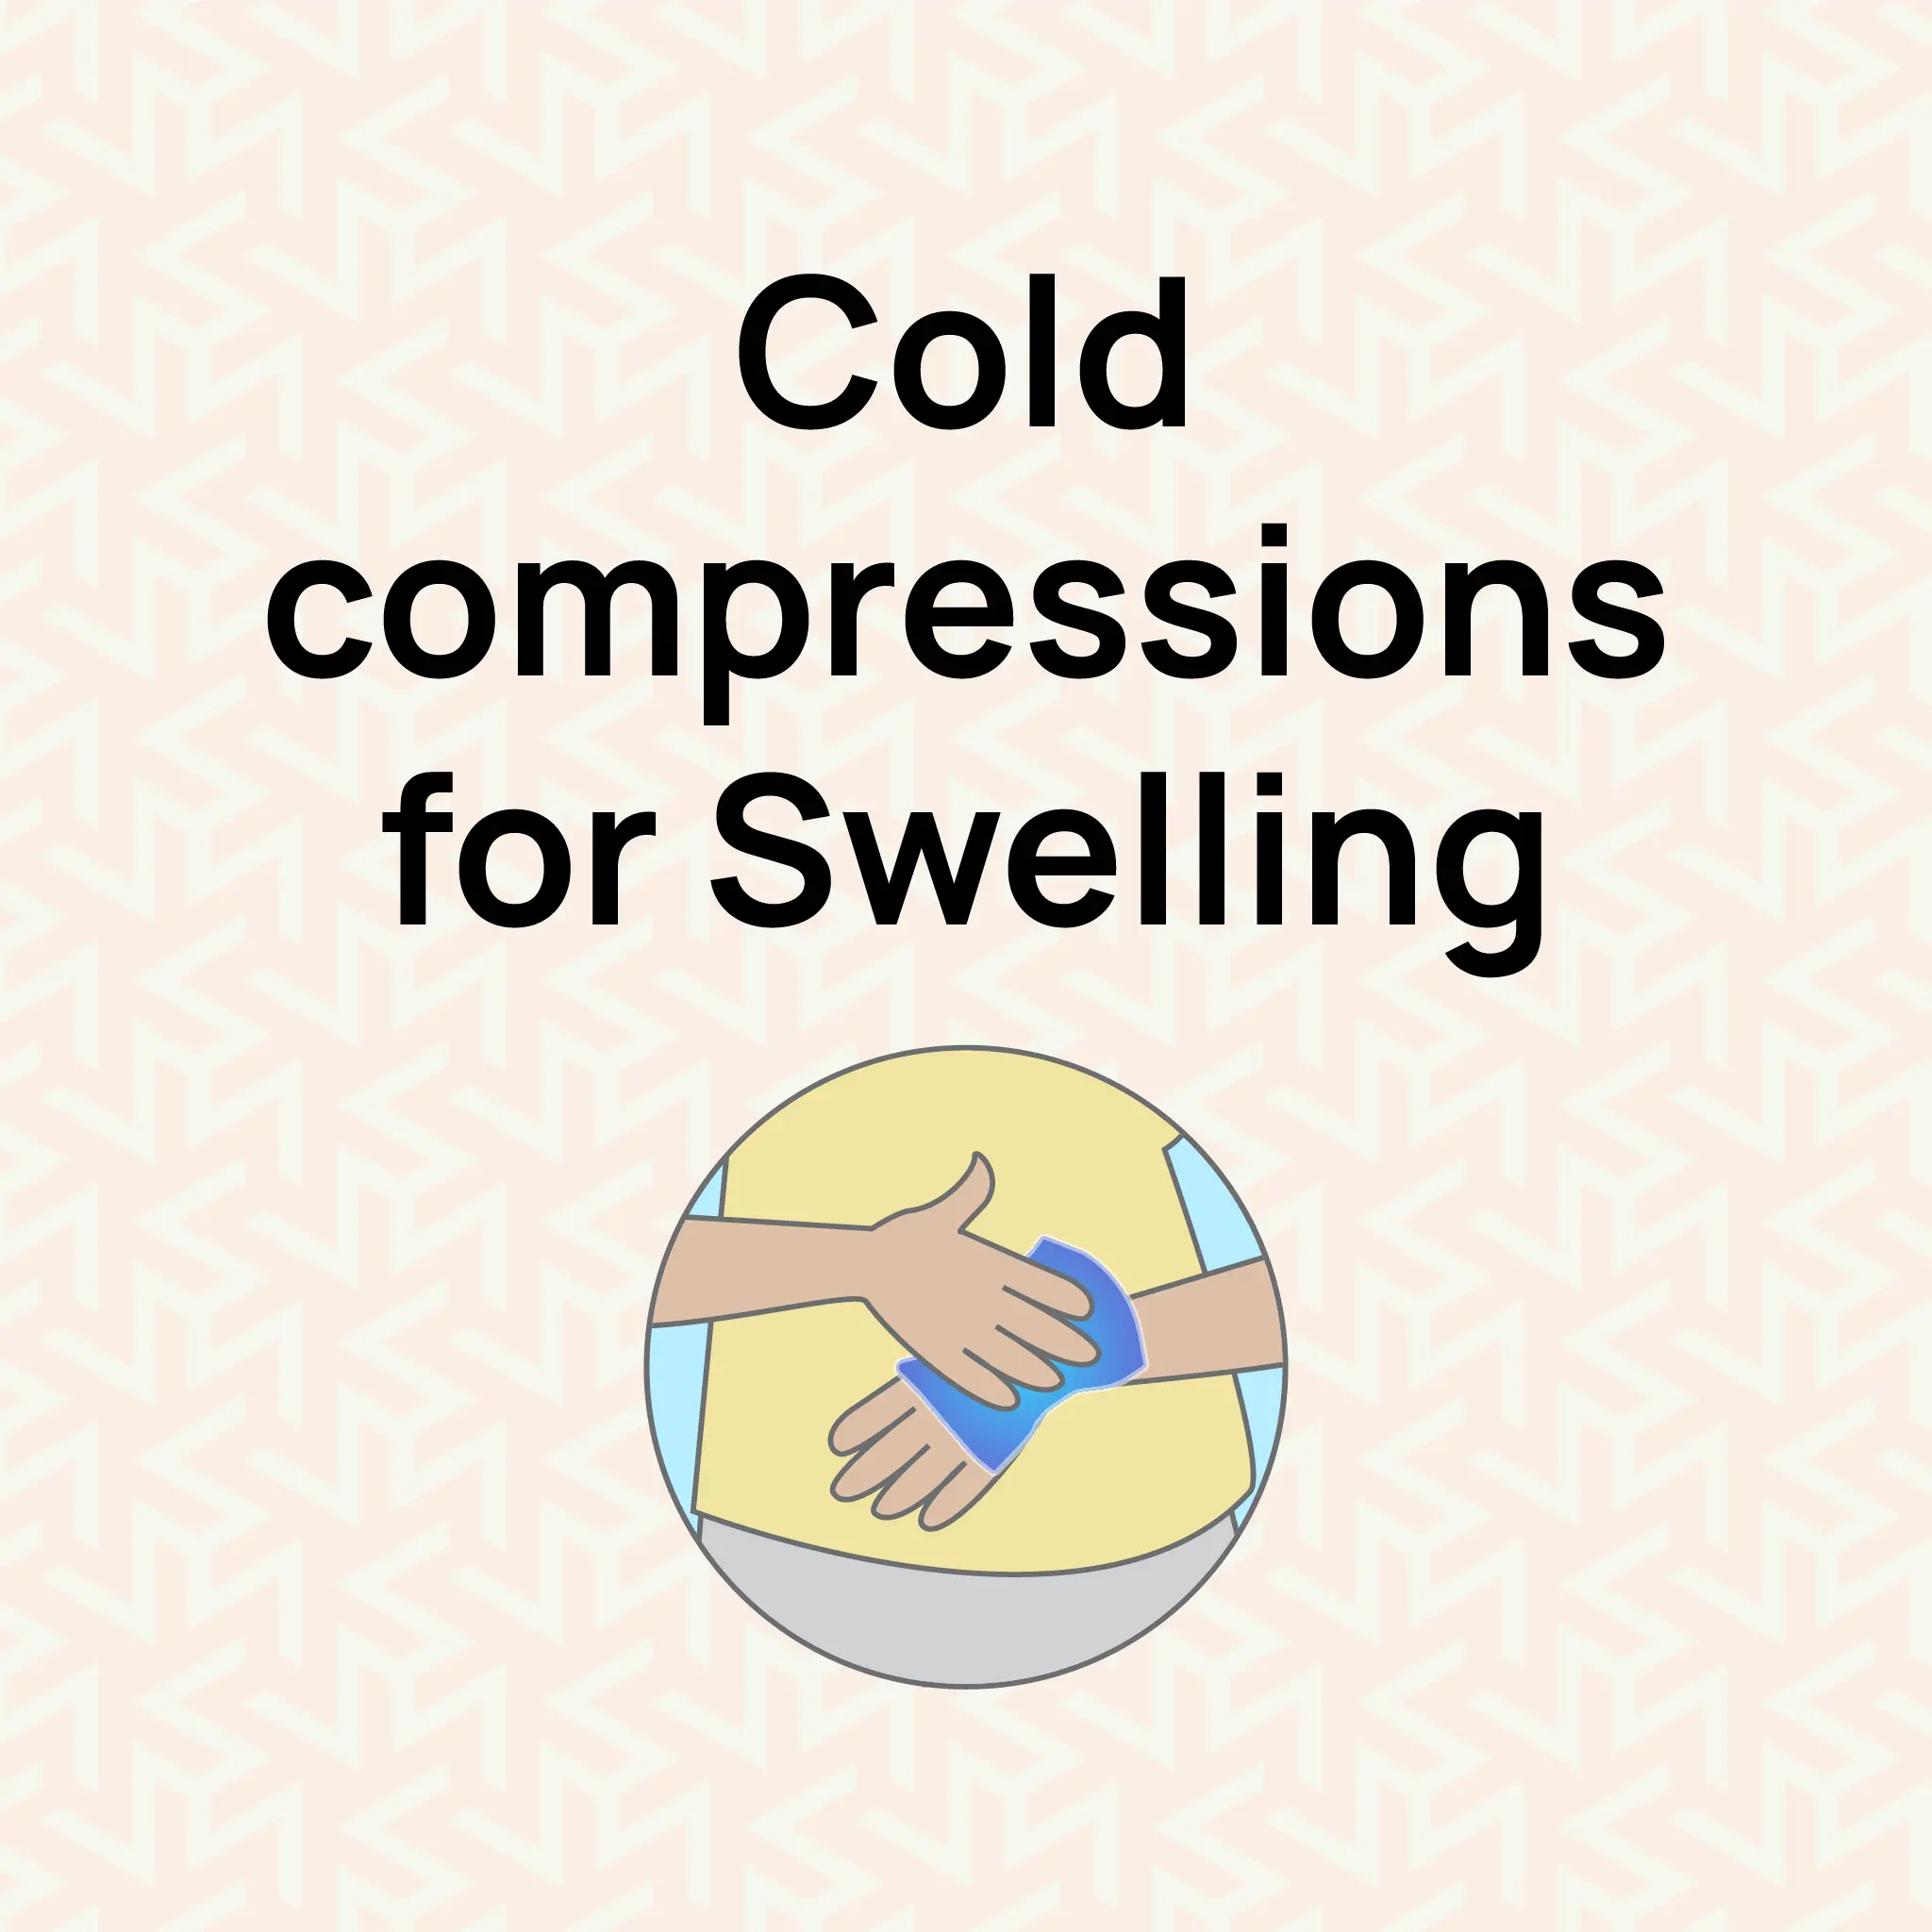
Cold compresses for Swelling: Your Go-To Guide
Inflammation is a condition that may occur due to several reasons, including injuries, an allergic reaction, or an underlying medical condition. Whether you have sprained an ankle, been stung by a bee, or are suffering from swelling post-surgery, it is imperative that you know how to manage it. A cold compress is exceptionally effective and one of the most widespread remedies for managing swellings. Let's take a deeper look at what a cold compress is, how it works, and the appropriate way to use it.What is a Cold Compress?A cold compress is a therapy in which cold is applied to an injured or inflamed body part. It can take the form of ice packs, frozen foods like frozen vegetables, or a piece of cloth dipped in water and then frozen. The primary purpose behind these cold compressions is to compress blood circulation in the injured area, thereby minimizing swelling and alleviating pain.How Does a Cold Compress Work?There is simple science behind cold therapy; it immobilises the area and causes constriction of blood vessels, a process known as vasoconstriction. This helps reduce edema. Furthermore, if you are suffering from inflammation, the cold compression can significantly reduce it while alleviating pain. Below you will find a list of situations where using a cold compress will be helpfulAcute Injuries: If you have a sprain or fracture, having immediate access to a cold compress can be highly beneficial.Post-Surgeries: Using a cold compress reduces inflammation, which inadvertently helps speed up the healing process.Allergic Reactions: Itchy or swollen insect bites can be extremely irritating; using a cold compress can bring some relief.Chronic Conditions: Other health issues such as rheumatism and arthritis can also be soothed with cold compression treatment now and then.How to Use a Cold Compress EffectivelyPrepare Your Cold CompressIce Pack: The simplest ways are to wrap an ice cube in a cloth or use a commercial gel pack.Frozen Vegetables: A sack of peas or corn is good and can be shaped to the body.Cold Water Soak: Take a clean cloth, dip it in cold water, squeeze out the excess, and place it where you want to cool down.ApplicationDuration: If a cold compress is used, it should be applied in short intervals of 15-20 minutes. Do not overexpose yourself, as this can lead to frostbite or skin damage.Frequency: Repeat every 1-2 hours during the first 48 hours after an injury or swelling has occurred. The length of time for which an ice pack should be applied is crucial.Barrier: To avoid direct contact, never lay your skin directly on the cold source; always use a cloth or towel.Monitor Your ResponsePay special attention to your body�s reaction. If the cold compression causes pain or itchiness on the affected area, you should stop using it.Additional TipsCombine with Rest: R.I.C.E (Rest, Ice, Compress and Elevation) is a therapy that focuses on cold therapy after rest and stable elevation of the affected body part.Stay Hydrated: Sufficient water intake can help speed up the healing process.Consult a Professional: If pain persists along with other symptoms like redness or heat, it is advisable to seek professional help from a medical practitioner.� .main{ border:3px solid #0f7c90; border-radius:20px; position: relative; font-family:roboto; font-weight: 400; color: #000; } .main-two{ position: absolute; top:-25px; left:45px; background-color:white; } .img-div{ border-radius : 100%; padding:2px 7px; background-color:#0f7c90; margin-right:5px; width: 50px; height: 50px; } .img{ width:30px; object-fit:contain; height:auto; border-radius : 100%; } @media only screen and (max-width: 600px) { .heading{ font-size:20px; } .img{ width:20px; object-fit:contain; height:auto; border-radius : 100%; } .img-div{ width: 40px; height: 40px; } .main-two{ left:25px; } } If you found this guide on cold compresses helpful, why not learn more about effective recovery techniques? Our Emergency First Aid at work course offers expert strategies, step-by-step instructions, and additional remedies to help you heal faster and feel better. ConclusionAn ice pack is one of the most effective tools for managing inflammation and pain. Learning how to use it can facilitate a faster recovery from your discomfort. This easy-to-implement method can make a significant difference if you require first aid, have an allergic reaction, or are recovering from surgery that leads to post-operative swelling. As with all types of therapies, never disregard your body�s cues and seek professional help if you experience chronic or worsening pain.
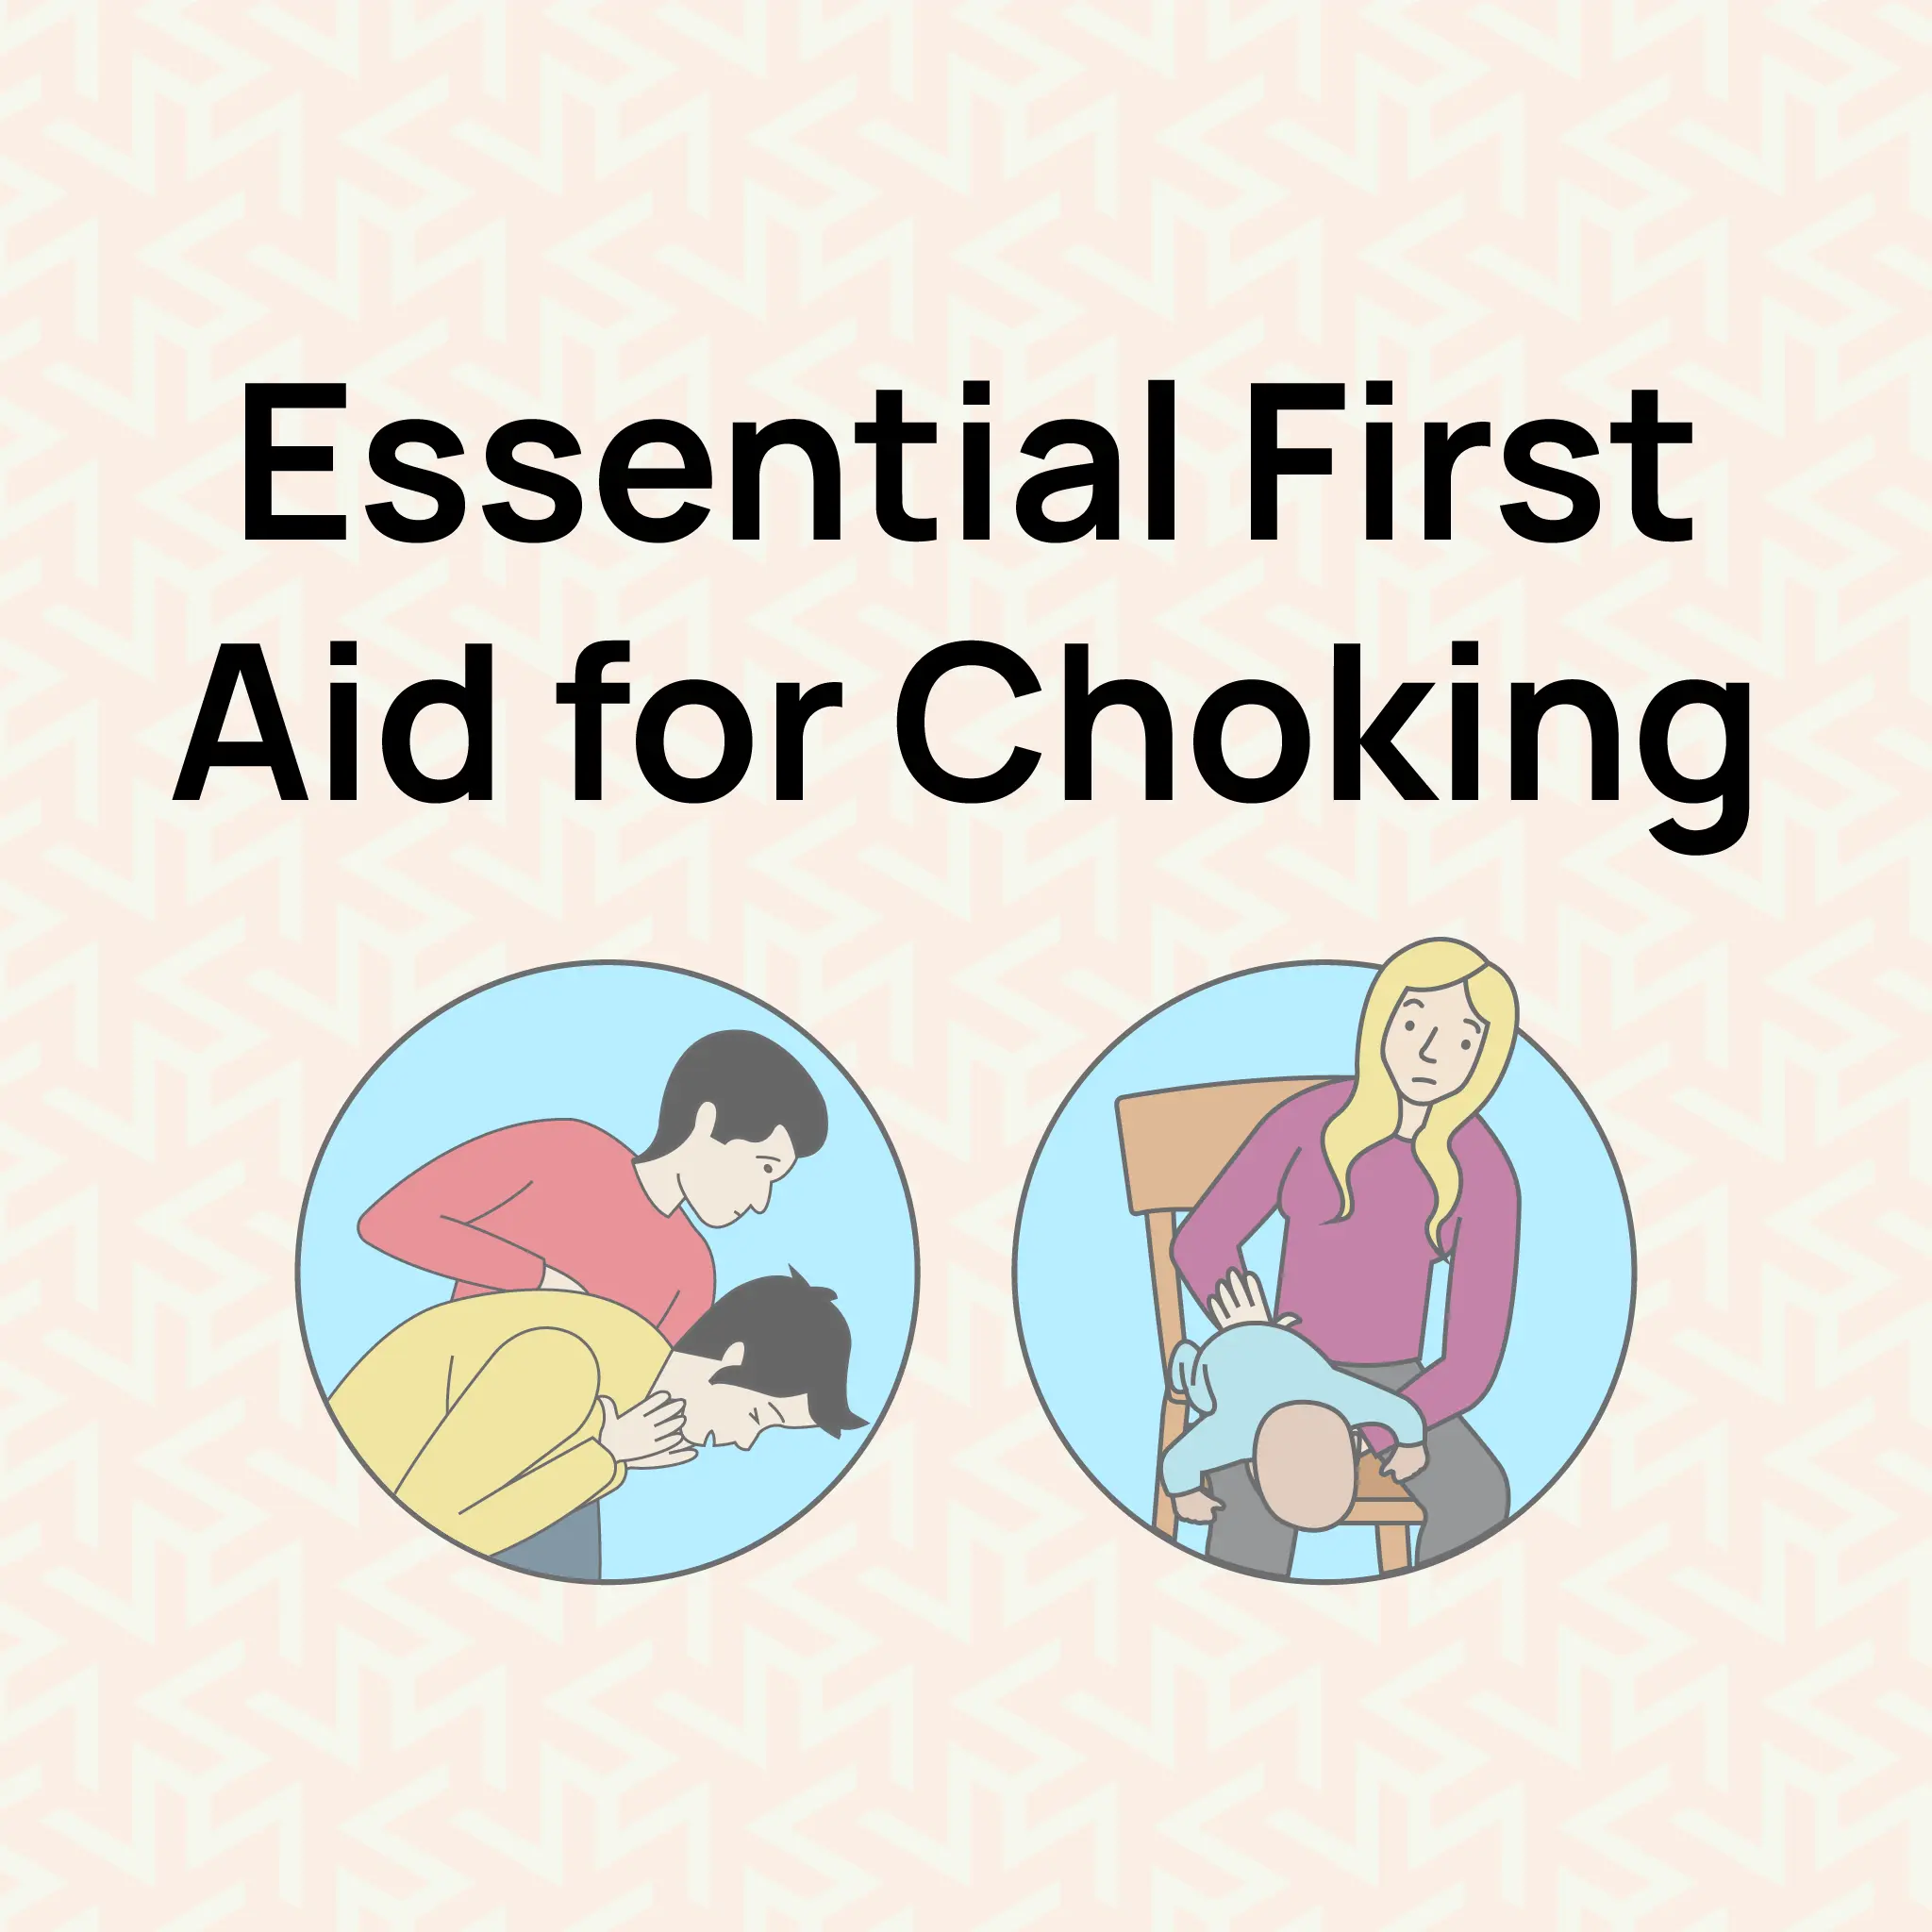
Choking First Aid
Understanding Choking Food Choking: The Adult NemesisHave you ever experienced the panic of someone choking? I have, and let me tell you, it is not something you would want to confront without adequate preparation. I am referring to both Food choking in adults and babies choking � either way you need to be prepared with adequate knowledge that covers how to perform first aid when such a scenario arises � Acting fast and efficiently when someone is choking can save a life. Let us dive deeper into understanding choking. The treatment and 1st aid for choking.Infant Choking: A Parent's NightmareWhat to Look For: How to Recognize ChokingWe will discuss choking treatment later, but let�s cover the signs first.The hands-on-the-throat universal sign of chokingSeems unable to talk, cough or breathe correctlyEyes are panic-strickenDeep wheezing, or abnormal retraction- gasp soundsParts of the body turning violet or ashen blue throughout the bodyLoss of consciousness (this is the most extreme case)Choking Management: First Aid Guide with DiagramsFor Adults and Children Over 1 YearEncouraging coughing � for some people that is enough.If coughing fails, it�s two-hand back slap time. Deliver five upward fist-strikes between the shoulder blades.Still stuck? Abdominal thrusts, also known as the Heimlich method, is the next step.While standing behind them.While putting your arms around their waist.You make a fist just above their belly button.While seizing your fist with your other hand.In a rapid velocity, deliver quick paroxysms stroke in an upward direction.4.Repeat the previous steps by alternating back blows with abdominal thrusts until the object becomes dislodged.Infant Choking: How to Help an Infant ChokingWhat should you do if an infant is choking? This is a question that comes up quite a lot, take note of the following and remain composed throughout the taskWhat to Do if an Infant ChokesPlace the baby on their stomach along your forearm.Do five back blows that are both soft and hard.If that doesn't work turn them around and give them 5 booty bumps.Keep alternating between back blows and booty bumps until you can remove the obstructionBearing in mind that there is no such thing as abdominal thrust for babies.When to call for help and How to Do It999 can be dialed without hesitation in the event that:You were choking yourself and were all by yourself in the roomThe person passes out.If you can�t seem to help the person due to severe airway obstruction .Choking Treatment: Beyond the EmergencyKnowing the 1st aid for choking is important but now let�s discuss prevention methods:Cut food into small pieces especially for kids and elderlyChew food well and for your throat to be at rest. Let your mouth do the workInfants and Toddlers should not be allowed to play with small objectsInfants and young children should be supervised while eating at all times� .main{ border:3px solid #0f7c90; border-radius:20px; position: relative; font-family:roboto; font-weight: 400; color: #000; } .main-two{ position: absolute; top:-25px; left:45px; background-color:white; } .img-div{ border-radius : 100%; padding:2px 7px; background-color:#0f7c90; margin-right:5px; width: 50px; height: 50px; } .img{ width:30px; object-fit:contain; height:auto; border-radius : 100%; } @media only screen and (max-width: 600px) { .heading{ font-size:20px; } .img{ width:20px; object-fit:contain; height:auto; border-radius : 100%; } .img-div{ width: 40px; height: 40px; } .main-two{ left:25px; } } Be Ready to Help in Choking Emergencies! Choking can happen in an instant. Are you prepared? Discover essential first aid steps to take if someone is choking. Get certified now by enrolling in our Emergency First Aid course and learn how to potentially save a life. FAQSWhat are the 5 steps if someone is choking?Cough it outSlap it outSqueeze it outCheck their mouthCall the emergency helpline (999)What is the first aid practice for choking?If a person is choking and having difficulty talking or crying or laughing forcefully your immediate response should be to give them five blows and five swift abdominal thrusts.What not to do when someone is choking?It is crucial that you remember never to pat an infant on the back if they are able to cough, in such situation slapping them on the back may dislodge the object and might be inhaled deeper in the airwaysWrapping It Up: Be Prepared, Save LivesFew points to remember � this is your ultimate preparedness guide in terms of choking first aid, whether it be adult food choking or infant choking and the appropriate response. Exceptional as that may sound, I assure you that this information will remain with you.Please keep in mind the following because in the event that there is no time to call for help and the person is in danger of choking it is you who will be the first patient�s helper. As a first responder you should be familiar with the importance and benefits of first aid. Relax and do something about it. Listen to your body as it will tell you that you can go back to doing what you do best!In this regard, I would like to ask a brave question � have any of you been in practice and had to use these skills? Or using a bit of food choking yourself how close dilation did you get? Please do share your experience in the comments. We can teach each other and raise awareness on this important life-saving technique.Take care of yourself and may all of your meals go down with ease.