On This Page
July 24, 2026
10 min read
When someone is unconscious, their life is in danger. Their airway might be blocked, they may not be breathing, and their blood circulation could have stopped. It is important to follow the primary survey steps to assess casualties in the order of DRABC: Danger, Response, Airway, Breathing, and Circulation. Remember to take quick action because brain damage or even death can happen quickly. A secondary survey is performed after completing the primary steps of first aid.
When helping someone in an emergency, you always start with the primary survey. This means you quickly assess what is happening and the person's needs.
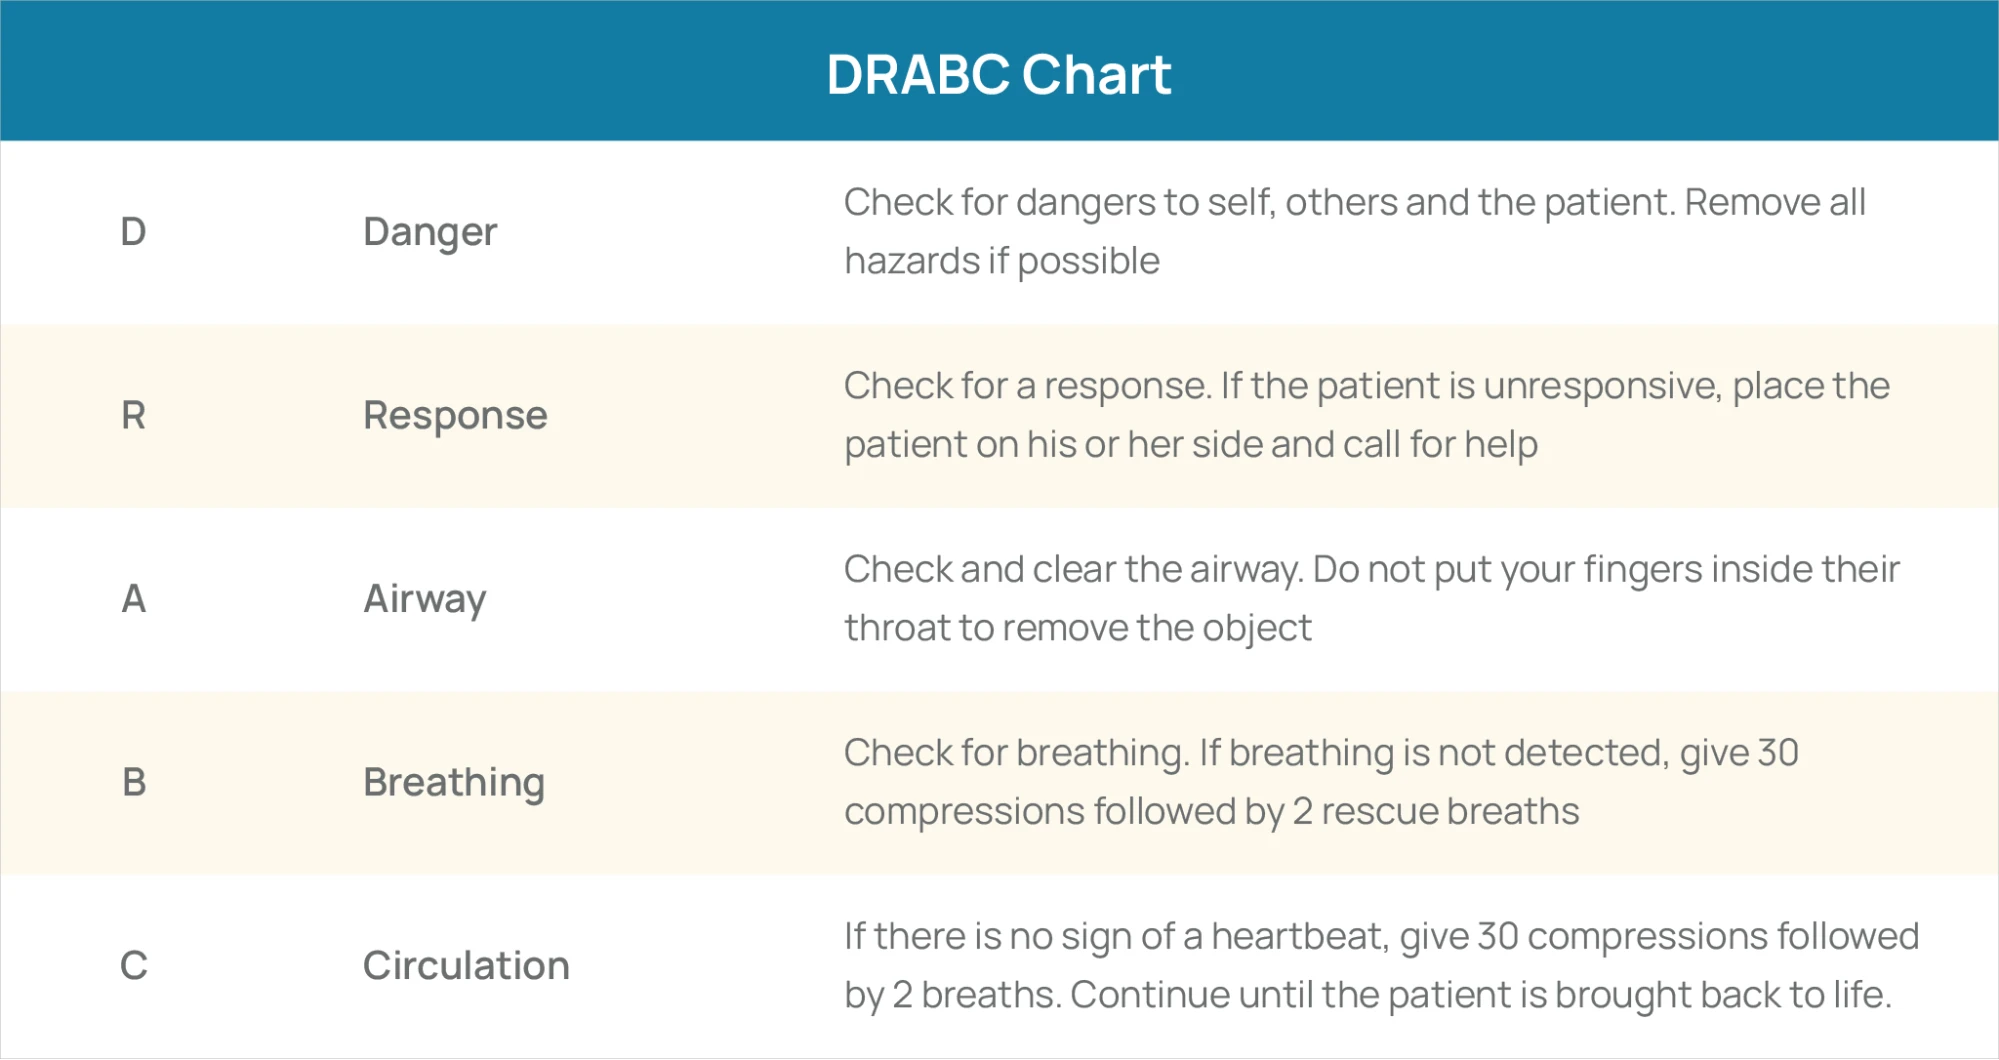
The primary survey uses the letters DRABC to help you remember the steps: Danger, Response, Airway, Breathing and Circulation.
D - Danger: First, you check for danger around you, such as oncoming traffic or a falling object.
R - Response: Next, see if the person responds. Gently shake their shoulders when you talk to them. Are they awake or unconscious?
A - Airway: Then, make sure their airway is clear. That means checking if anything is blocking their breathing passage.
B - Breathing: After that, check if they're breathing normally. Look, listen, and feel for any signs of breathing.
C - Circulation: Finally, check for signs of circulation, like a pulse. This tells you if their heart is beating.
Knowing what to do next could help save someone's life, so it's important to follow these steps in the correct order.
The first thing to do in an emergency is to check for dangers. Look around to see if anything could harm you, the person needing help, or anyone nearby. This helps you decide if it's safe to go close to someone who needs help.
WHAT TO DO
If you see any hazards, like live electricity, try to make the area safe first. For example, if there's electricity, turn it off. Otherwise, use an insulating object, such as wood or plastic, to move the person away. When there is a risk of electricity, do not touch them directly.
When you are sure it is safe, you can approach the person who needs assistance. But if it's still not secure, don't go near them. Instead, get emergency medical help
A person can lose consciousness when something disrupts the brain's normal functioning. Here are some signs that someone might be unconscious:
They can't respond to simple questions or touch.
They might not realise when they're in danger and can't protect themselves.
They can't clear their airways by coughing or swallowing. This means saliva, blood, vomit, or objects could block their breathing tubes. The tongue, which becomes floppy, might also fall back and block the throat.
WHAT TO DO
First, try to determine whether the person is unconscious by asking simple questions or telling them to do something simple, such as "What's your name?" or "Open your eyes," and gently shake them. If they don't respond, they're probably unconscious. Don't shake them vigorously, especially if they're children or babies.
Place the individual in the side position, and examine his airway, breathing and pulse.
If the unconscious person is breathing and has a pulse, keep them in the side position. Ensure their airway remains open and clear, and monitor their breathing and pulse regularly until medical assistance arrives.
This is also called the lateral, recovery, or stable side position.
Kneel beside the person.
Straighten their far arm out, perpendicular to their body. Bend their near arm at the elbow and place it across their chest, with the fingers near the far shoulder.
Bend their near leg up to the right angle of their body.
Hold the shoulder and hip closest to you, gently rolling them onto their side. Their top leg should rest on the ground with the thigh at a right angle and the calf parallel to the straight leg.
Rest their uppermost, bent arm on the elbow of the straight arm.
the person is a child older than 1 year, gently tilt their head back. Their face should be slightly downwards so any fluid can drain from their mouth, and their tongue can fall forward, away from the airway.
Pro Tip:
When someone is unconscious, act fast. Use DRABC: Danger, Response, Airway, Breathing, Circulation. Brain damage or death can happen quickly if you delay.
Now, ensure the person's airway is clear. If they're unconscious:
Gently tilt their head back and lift their chin with your hand on their forehead.
Peep in their mouth to check whether something is obstructing their passageway.
What to Do: If the person is responsive
Check whether anything is obstructing their airway and causing difficulty breathing.
If you see something, encourage them to clear it by coughing or using their hands.
For adults and kids, you can help them by giving back slaps or abdominal thrusts. For babies under a year old, you can help them with back blows or chest thrusts.
Once the blockage is cleared, move on to the next step.
What To Do: If the person is responsive
Check whether anything is obstructing their airway and causing difficulty breathing.
If you see something, encourage them to clear it by coughing or using their hands.
For adults and kids, you can help them by giving back slaps or abdominal thrusts. For babies under a year old, you can help them with back blows or chest thrusts.
Once the blockage is cleared, move on to the next step.
What To Do: If the person is unresponsive
If you see something, try to remove it carefully. But don't put your fingers in their mouth if you can't see anything, as you might push a blockage deeper.
Breathing should be regular, quiet, and easy. Tilt the head back, watch the chest for movement, and listen for breathing sounds. Do this for about ten seconds to see if air comes from the mouth or nose.
WHAT TO DO
If they're unresponsive and not breathing normally, call emergency services immediately. If you know CPR, start with rescue breaths. If not, do chest compressions. If there's an AED nearby, ask someone to bring it.
Mouth-to-mouth resuscitation is the best way to give rescue breaths. Mouth-to-nose resuscitation is used for a jaw injury or if the person needs to be revived in water. Mouth-to-mask resuscitation is done by trained people to avoid direct contact, especially if the person might have a disease like hepatitis or HIV.
Typically, 30 compressions followed by 2 rescue breaths are performed in case of abnormal breathing.
Kneel beside the person.
Lay them on their back.
Gently tilt their head back and support their jaw with your fingers. Don't press on their throat. Their mouth should be slightly open.
Pinch their nose closed. Take a deep breath and cover their mouth with yours, sealing gaps.
Keep their head tilted and give 2 breaths, enough to make their chest rise slightly.
Start compressions as recommended.
When they start breathing again, please put them in the side position and check their airway, breathing, and pulse regularly.
Follow similar steps for mouth-to-nose and mouth-to-mask resuscitation but adjust for the different techniques.
In this step, check the person for any significant bleeding.
What To Do
If they're bleeding heavily, try to stop it by pressing directly on the wound with a clean cloth or dressing. Then, call emergency services for help.
Stay with them until help arrives. Try to keep them calm and reassure them that help is coming. If they're not bleeding but still unresponsive, put them in the recovery position. This helps keep their airway clear if they vomit.
If someone's heart has stopped, CPR is vital to keep them alive until help arrives. CPR is exhausting, so it's best if two people can take turns to keep the rhythm right. Remember, even if you're not trained, attempting CPR is better than doing nothing.
Please don't go near the person unless it's safe. Check for danger to yourself, others, and the injured person first.
Stay as calm as possible, even though you might feel upset, and try to reassure the injured person.
Time is significant.
Don't move the person unless you have to for safety reasons.
Please don't leave them alone. Get someone to call for medical help straight away. But if you're alone and help won't come soon, you'll need to go for help yourself. Call 999 or the emergency number in your area.
Keep messages to the emergency services short: say where you are, what's happened, how many people are involved, and how badly they're hurt.
Please don't give them anything to eat or drink.
The Emergency First Aid training course is designed for low-risk environments such as offices and small retail stores. It gives participants the fundamental knowledge and skills to effectively manage emergencies in these settings.
DRABC in the first-aid primary survey stands for Danger, Response, Airway, Breathing and Circulation.
Use a primary survey and apply the DRABC steps whenever you witness a casualty, such as an accident or a fall, provided it is safe to approach the injured person.
The purpose of the primary survey is to treat life-threatening casualties quickly. These accidents could include airway blockage, breathing difficulties, shock or a brain injury.
First, check if the person is unconscious by asking simple questions and gently shaking them. If they don't respond, they're likely unconscious. Avoid shaking them vigorously, especially if they're children or babies. Next, put the person in the side position and check their airway, breathing, and pulse.
Typically, 30 compressions followed by 2 rescue breaths are performed in case of abnormal breathing.

Courses
Upskill with job-ready training.
Mock Tests
Measure your learning progress.
Create an online video course, reach students across the globe and earn money